Tuesday 30 September 2014

Colouring Basics

Hi! Hope you enjoyed Jenny's fabulously coloured cards yesterday. Today, I've kept it pretty simple.. plus this is a great example of how to hide your mistakes.
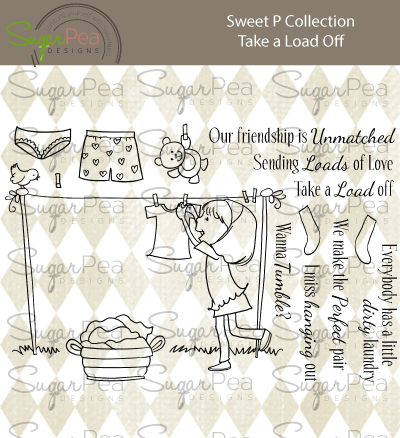
So, I've used the same set as last week from Sugar Pea Designs
http://www.makethedayspecial.co.uk/shop.php#!/Take-A-Load-Off/p/35349270/category=9064880
Now, I've kept the colouring really simple- and been playing around with the blender pen again. I've done a close-up to show you that you really need to blend for the best effects. Everything else on the card is blended well- I simply go over with the lightest colour, and don't use the blender pen overly. Look at the next picture- I've left the blue bear unblended- you can really see how the harsh lines don't help the dimension at all. 
 

So, the mistakes?
I stamped the clothes and added the line of black for the washing line..I wanted a very CAS look to the card. Sadly, I'd had a little bite to eat during crafting..and...there was a mark (possibly chocolate, but I really wouldn't like to admit to that!).
So, the grass 'cover-up' was born. I ended up with not enough 'grass' for the width but decided to leave that 'carefully planned' (!) element as it was.
As I'd solved that issue, I managed to get ink on a bit of grass. A lot more sighing later, decided to 'hide' the ink by way of Glossy Accents on the grass. A 'dewy' glow all over the grass. You can spy a little if you look at the photo.
As I looked and felt moderately smug, I noticed a water stain on the 'grass'.
Arggh. Too late. I'd adhered it down.
So, washi tape to the rescue.
Most mistakes are coverable. I'm not used to having to solve 3 on one project!
My colouring tip for today? Use your blender pen to create patterns on solid parts of your coloured image. Look closely- you'll see spots, stripes and dashes, all courtesy of the blender pen!
 
Hope your projects are mess and mistake free!
See you next week,
 
Keren x

Monday 29 September 2014

Colouring Christmas Cards...part 1

Hello and welcome to day two of Colouring week!!


   Wether you are new to colouring or proficient with your marker pens, I think that, by far the easiest images to colour in the stamping world are Lawn Fawn and Paper Smoches images as they are not too detailed and have good bold outlines...very much like colouring book images from our younger days :0)

I have made a set of five mini Christmas cards using Lawn Fawn Stamps, three of which I'll share with you today and then next week I will show you the remaing two and the Gift box I've made to put them in :0)

So lets kick off with the photos....
                                                    
By using small 10x10cm square cards I've kept the designs simple which is perfect for the Lawn Fawn Critters. I've used matching dies if I have them so this means I can stamp out a load of images onto a sheet of alchohol marker friendly card and colour lots of images in one go....this is a great way to practice as well as making a good reference sheet for Colour Combinations in the future.

Unlike a lot of crafters I use Promarkers as they were cheaper to start me off with but I love them and wouldn't change them at all. I tend to stick with the same combinations of colours...browns are my most used as I just love colouring furry critters.I've used Cocoa, Burnt Sienna and Umber for Mr Moose and I start by laying my lightest colour down first and work through to the darkest before going back through to the lightest. His antlers are shaded using Umber and Warm Grey 5 with a touch of black for a slight shadow underneath. Do you see the highlight along his back? I left this area un-coloured with the first application of colour... this means it only has one layer of colour which is applied when I blend over the image with the last layer of the lightest colour. Goodness that was a tongue twister!!!

These cute Winter Sparrows use a similar colour palette but I swapped the Cocoa for Cinnamon instead so the highlights are lighter. With small images like this you don't really need to use three colours as the card can become too saturated and bleeding can occur outside the lines...... I used very minimal strokes of the Umber here.
*TIP* If you have the matching dies for these little fellas it's worth die-cutting extra branches and birds to use stacked underneath the coloured image... that way you don't need to be cutting tiny pieces of foam to mount them onto your card front..much easier :0)


Colouring these Christmas lights was great fun as you can really exagerate your dark areas and highlights because they're meant to be shiny.... the hardest part was fussy cutting them out (fingers crossed matching dies will be released for this set). I've shaped the stamp on my acrylic block to make different curves, you can also repeat the pattern for larger areas if you wanted too :0)

                          Critters in the Arctic  Winter Sparrows  Cozy Christmas
                                     Violet's ABCs  Happy Trails  Hats Off To You

         Critters in the Arctic Creative Cuts  Hats Off to You Lawn Cuts  Winter Sparrows Dies  Happy Trails Die
As you can see from the above montage I'm a bit of a Lawn Fawn addict!! Click on the pictutres above to take you to the store if you're interested in any of the sets.
 I've made five different designs but you could equally choose one design to suit your stash and colouring technique and stamp a whole load of images out to colour at leisure in front of the TV or with music playing... using the co-ordinating dies helps speed up the process of cutting out, great for producing batches of cards :0)

Catch ya next week with the rest of the gift set
Jenny x

Sunday 28 September 2014

Colouring Week


We're doing something a little different on the blog this week - we're all focusing on colouring images for our projects.  I'm sure many of you will be focusing on colouring if you're taking a certain class that's running online right now, as a few of us are too, so we thought we'd focus on colouring here too for a change.

Each day this week, right until next Sunday, each DT member will bring you a different colouring project and a little colouring tip.  Whilst none of us are Copic-certified, or profess to be colouring experts, we all love to colour in our own way and have picked up things that work for us along the way that we'll share with you for free this week ;-)

I had a great afternoon yesterday, sat in front of the TV, remember how much I love to colour, whilst I coloured in this cute little guy from SugarPea Designs which I've been itching to colour ever since it came out but I haven't had time.


Isn't he the cutest?  I coloured him with a mixture of copic and tria markers with my light source on the right creating natural shadows on the left of each item on the image.  Once he was finished I cut him out using the Small Stitched Rectangle die from Lawn Fawn and cut a mat from Sweater Weather using one of the Large Stitched Rectangle dies again from Lawn Fawn.  I used the same tria marker I used for his costume to get a matching strip to die cut the flag for the sentiment using the stitched sentiment flag die from Lil' Inker Designs and finished with some twine and a button in yellow to tie all the colours together.

My tip is for creating shadows in flesh tones - I do it with a colour you might not naturally turn to - a blue-violet (BV00 or BV000 in copic shades)   It might sound odd, but it really does work.  I've coloured the Matador's face below twice - once without the BV shade (on the left) and once with it (on the right)


I coloured the whole face with the lightest shade (E00) and then added some shadow under the hat line, around his nose, the far left of his face and his left ear, using E21 and then on the left I added a thinner shadow in the same places using E11 which gives a suntan effect, but on the right I used BV000 which gives a more natural shadow without darkening the skin tone.  You then blend it back with E00.

So - we hope you like our concept for the blog this week and have fun with all our DT members!


News from the Store:

We've had Lawn Fawn restocks this week.

We've had the latest releases from Wplus9 and Avery Elle.

Paper Smooches and Winnie and Walter are crossing the Atlantic and should be here in a couple of weeks.

Hero Arts inks and their stunning Christmas release will be in store this Tuesday!

Next Saturday is World Card Making Day so there will be something special happening here on the blog - don't forget to come back and check it out ;-)

Catch you next Saturday!


Saturday 27 September 2014

Fall is here!

Hello fellow crafters! I don't know about you, but I love love love fall. The oppressing heat finally goes away, the leaves turn to all kinds of colors, the grapes are ripe in the vineyards and beg to be … borrowed ;)

The season has so many joyful aspects, it's no surprise there are a ton of products in the store that let you celebrate it (and not just Thanksgiving). Today, I dug out my trusty Lawn Fawn Stitched Leaves dies, which are finally back in stock again, and inked them with some Distress Ink.


By applying first a light shade of color, and then adding a darker shade of the same color family to the edges of the leaves, you can create a wonderful realistic effect. And the stitching on the leaves – swoon! For the stitching to come out well, I found that using heavier paper does the trick: there's simply more for the dies to sink into and leave that impression.


I also used heavy watercolor paper (almost like card stock) for the entire card. It has a wonderful texture that enhances the leaves and the overall "natural" look that I was going for. You can also see that on the stitched border I have around my front panel, which was cut with the Mama Elephant Basic Set Creative Cuts.

The background of my card was stamped with a few tiny images – I actually used a stamp set from a company that's not in the store, but Lawn Fawn has just released two stamp sets which allow you to achieve the same effect: Thank You Tags and Sweater Weather. They have tiny leaves, nuts, and even a pumpkin which are perfect for this season!


The sentiment was cut with Wplus9's Hand Lettered Hello die from adhesive wood veneer sheets – they come in a pack of ten and you can pick the color that goes best with your card. For mine, I choose one of the darker colors to make the word stand out more. And the texture, oh this beautiful texture…

To finish the card off, I added some sequins in matching fall colors – I know, not very "natural", but a girl needs her bling.

I hope you enjoyed today's card and I hope you have a beautiful fall weekend!


Friday 26 September 2014

All Ears!

Hello and happy Friday! I don't know about you but I am looking forward to this weekend to get to spend some time with the family :)

Today I'm sharing a card using the fabulous 'Honey Bunny' from Mama Elephant. Now this was one of the sets that could not stay in stock but guess what ?!?!? There is some in stock now so if you want it I would grab it while you can (I did ;) )....


How gorgeous are those cute lil bunnies?!?!? Now this doesn't have to be a cheer up card I think just changing up this sentiment and adding a couple of hearts would make this into a fabulous Valentine's card.

For the scene I have used the Landscape Trio (sorry OOS although you could use Lawn Fawn 'Stitched Hillside Borders' that would give the same effect) and added some watercolours to the pieces before creating the scene.  

Thank you so much for stopping by!

Hugs Lydia xxx


Honey Bunny  Landscape Trio Creative Cuts Stitched Hillside Borders Lawn Cuts

Thursday 25 September 2014

Throwback Thursday

Hello!
Happy nearly weekend day!

Todays card was inspired by 'that' John Lewis advert last year,you know the one-hare and bear? Well as soon as I saw Lawn Fawn's Hello Baby and Love you S'more ,it made me think of those two


They are too cute! I stamped onto watercolour paper with Archival ink,then watercoloured them with distress inks. I gave bunny a 'fluffy' tail using some puff-pen and mounted the card on to script paper 

I wanted to keep the middle of the hill paler so it didn't dominate the card with green.
I am looking forward to this years John Lewis commercial-they always are a tear jerker for me!
Have a great Thursday,see you next week!
Lou x

Wednesday 24 September 2014

Happy birthday wishes


Hello.
I have two cards today using Wplus9's happy birthday wishes stamps and dies.
For my first card i stamped the large happy in shades of blue.
I stamped at an angle for a different look.
I stamped and due cut the balloons and added with foam tape and some twine.
The sentiment was stamped on vellum and adhered to the card using glossy accents.
I finished with some card candy in matching colours


The next card is almost the same as the first but instead of stamping the happy i die cut it from balsa wood
.The balsa wood is currently out of stock but we do have the Wood veneers and they will work just as well.
Click the images to go straight to the products :)

Whole Lotta' HappyWhole Lotta Happy DiesBalsa Wood


Peel & Stick Veneer PackHappy Trio Dies

Thanks for looking.