Thursday 30 April 2015

Altenew Revisited

Hello!

I pulled out one of the old Altenew sets for a play today:


Can you tell which set it is? 

Yes, it is the fabulous Lace Up set which is 15% off in store at the moment.....

I was initially a bit reluctant to get this set as I was daunted by the large focal image but I am so glad that I finally bought it as it is so intricate and versatile.  Here I gold embossed it on vellum and cut it out.   The vellum is layered on top of a die cut square on which I had partially inked a diagonal stencil.  I finished with a tag and die cut sentiment from Lil Inkers.  Isnt it fun when your products all play nicely together?!


I am looking forward to playing with this set some more and will let you know how I get on :)

Thanks for stopping by,

Sarah x

Lace Up  Large Stitched Square Lawn Cuts   Awesome Word Die  Hero Arts Gold Embossing Powder

Wednesday 29 April 2015

April Challenge Winner

Well it certainly seems you like to play tic-tac-toe - we'll bring you another board for a future challenge as we had lots of amazing entries this month - we could have picked out lots of winners but we can only have one prize winner and this month the £15 voucher goes to Natty for this stunning floral and strips creation.


Natty did an amazing job with Vintage Roses from Altenew (sorry still out of stock but they tell me they will be getting more in a couple of weeks so I will grab them as soon as I can!) and I love the contrast from the different stripes - makes such a elegant feminine card.

We picked 3 runners up this month as it was so hard to choose.

Francesca's shaker card is such a cute entry - look at all those little fish tails she cut to make the shaker bits!


Jo's asymmetric design is really eye catching and would appeal to anyone like me who has a comic-geek in their life.


Tanja made not one but 3 thank you cards all which fit on our tic-tac-toe grid and all are super cute too!


There is one final card that needs a mention - this would have been up there with the winners as Jill showed off our own brand wood veneer sheets to perfection with this great design - but unfortunately Jill is no longer eligible to win our competitions.   It's not all bad news though as  I can finally let the cat out of the bag now and let you know that Jill will be your new girl-Friday on our blog from 1st May as she is taking over from Lydia.   I know you will all be inspired by her designs as much as we are so do pop by on Friday to say hello to her - and to see our new challenge which also goes live that afternoon!


Happy mail


Hello.
With all the  cards i make i rarely send many out, i have decided to make more effort in changing that. 
The gleeful gardens stamps from lawn fawn have a wonderful snail mail sentiment that helped me decide.


Both cards are simple in design.
I used the gingham backdrops with hero arts ombre inks on the card base.
The die cut images are all coloured with copics and then adhered to the stitched circle panel.
The  cards as they are going to be mailed are mostly flat with no embellishment just the envelopes and bird on foam tape.
I selectively inked the sentiment to just use the parts i wanted.

Gingham Backdrops  Gleeful Gardens Lawn Cut Gleeful GardensSmall Stitched Circle Lawn Cuts

Ombre Ink Pad Mint to Green

Thanks for looking.


Tuesday 28 April 2015

Triangular Hugs!


 Hi! I thought I'd do another project using the Hero Arts Triangle background        
                                                        http://www.makethedayspecial.co.uk/shop.php#!/Triangle-Background/p/48307953
                                                  
It's such a great set- I haven't even stamped it in colour yet. I simply embossed with white embossing powder onto white card.
http://www.makethedayspecial.co.uk/shop.php#!/Hero-Arts-White-Embossing-Powder/p/43293335

I wanted to create something very clean and simple. I've been creating cards that take a little longer recently so it was great to do a project that took so little time.              
                                
I've layered up a few elements from the Sending You set by Avery Elle. 
                                                                http://www.makethedayspecial.co.uk/shop.php#!/Sending-You/p/37375105
With a little fussy cutting, it adds layers without becoming too cluttered. With the cutout parts of the triangles and the cardstock underneath, there are actually 4 layers where the 'hugs' sentiment is but you wouldn't necessarily think it initially.
You can just about make out the ombre colours in the sentiment. I used one of the new Ombre pads from Hero Arts.
Check out the other ombre colours- they're really beautiful. You do need to move the pad around a little when stamping so you can't see the change between the colours and the ombre colours flow seamlessly.

I lastly added a strip of ombré paper.

Do go and see what's slipped into the store without you noticing! These big background sets are amazing!

See you next week!
                          

Monday 27 April 2015

A Trekkie Graduate!!

Good Monday morning to you :)
First of all I'd just like to say that I'm not a staunch Trekkie and I'll apologise now for putting the well-known theme music into your mind so you'll be whistling it all day!!! :)

Edited to add: well it just goes to show that I'm not a fan at all as I got the wrong movie...whoops ;) It's Star Wars !!! Apologies folks :) thanks to Ruthich for pointing it out in the comments :)

I've used two stamps set from Neat & Tangled called Time Warp and A Long Time Ago to make a card ready for Graduation season.... we have quite a few months yet but I just wanted to have a play with watercolours and make a space scene :)

 
As I said before, I'm not a fan at all but those iconic titles disappearing into the distance are so easily recognisable.... and this set covers birthdays, retirement and graduation... not to mention being perfect for the guys in your life :)
 
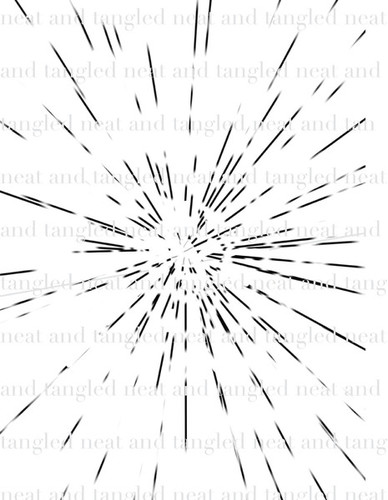
I started by clear embossing the Time Warp onto watercolour card and then masking around the edge of the rectangle with Frog Tape. I find Frog Tape the best for this job as it doesn't allow the watercolour to soak underneath :)
I used a mixture of blues and black, remembering to keep the darker colours towards the outside so they don't overpower your sky. When you're happy with it and it's dry to the touch you can place the piece between a folded sheet of plain paper and run a cool iron (no steam) over it to take the clear embossing powder off the dashed time warp lines. This means you can emboss the sentiments easily and it helps to dry and flatten your watercolour card too :)
 

I do recommend that before you stamp the sentiment you test to see if the card is dry. To do this, apply some clear embossing powder to the watercolour piece and tip it off again to see if the powder slips away easily, if it sticks to the surface you'll need to brush it back into the container and let the card dry some more.

I trimmed the piece down, adhered it to a grey card blank and added a white frame that's raised on foam pads... I kept it clean and simple so the time warp was the focus of the card :)

Time Warp A Long Time Ago

Now for my usual Monday reminder about the Paper Smooches Sparks Challenge, this week we have a sketch for you and here's my take on it using Woofers and Tweeters along with a different way to use the Big Blooms die!!

 
Thanks for stopping by :)
Jenny x


Sunday 26 April 2015

Die-cutting Day!

After a full week of stamping, I thought today I'd switch to die-cutting so I have 3 cards to share today made with the new dies from Lil' Inker Designs with not a single stamp in sight!


The new boxed up birthday die is just perfect for making a dramatic statement on a card and it has so many uses.  For this first card I used our own brand of wood veneer to add some texture (these are thin sheets of real wood with a sticky backing perfect for die cutting).  I layered the die up behind the wood with some layers of craft covered with stick-it to avoid any fiddly glueing.  For this card I wanted to go girly so the natural choice was the beautiful new perky posies dies which have a variety for flowers and leaves in different sizes all with lovely stitched details.  Some enamel dots make perfect flower centres.  I added the flowers both behind and in front of the raised die cut and mounted it all on the ever popular quilted stitched pattern die on top of a card base from Avery Elle.


For my second look I used the new petal card die but I wanted to make it feature on a little card rather than a card itself.  I die cut it from a sheet of double-sided paper from our new range from Echo Park, this one is from the Birthday Wishes Girl pad, and then I trimmed the edges off boxed up birthday so it fit neatly inside and simply mounted the whole thing onto a mini card with a coloured matt.   It's displayed on their mini-easel which is a great little tool.


For my final card I wanted to go really simple as I thought the die is so striking on its own it needs little else.  Here I've gone for a quick masculine card - die cut boxed up birthday 3 times from 3 shades of blue card (again with stick-it sheet glue on the back before you die cut to make sticking it together super fast)  and then off setting it very slightly with each layer.  Once stuck together I ran it through my die cutter to get a flatter look.

 
NEWS FROM THE STORE:

  • We've had massive restocks from Lawn Fawn this week (and I've already been given a sneaky peek of their next release which I can't share yet but you're going to love it and my order is already in so we should get it as soon as it's available stateside!)
  • We had Lil' Inker Designs latest release and restocks yesterday
  • We have a little more from Echo Park and Hero Arts which will go live this afternoon hopefully
  • We have the latest releases from Newton's Nook in transit
  • We have massive restocks coming from Mama Elephant but unfortunately they've been caught up in a customs investigation so may not arrive for another week or longer.  They had no release in April but will have a new release on 15th May which I will get as quickly as I can.
  • We have a huge order coming from Paper Smooches with the latest release and massive restocks - they should be here next week with luck.
  • Avery Elle restocks will ship on Monday so they should also be here by the end of the week.
  • Sugar Pea Designs should be shipping soon - I know you've been waiting so long and I'm sorry but there have been a number of issues and now the next release is almost here so both are shipping together so at least we'll be caught up when it finally arrives!
  • We've just placed an order for the next Neat and Tangled releases which has a stamp and die set I know you are going to LOVE!
  • I know so many of you are waiting for Altenew restocks again - they are out of stock at their end - they expect restocks early- to mid-May and I will get them as soon as I see they are available again.
  • We are nipping to London tomorrow, just for a couple of days, so I can see my musical idol Melissa Etheridge so any orders that are placed after 8pm today won't ship until Wednesday.

Happy Crafting
Tara
x


Saturday 25 April 2015

Stamping Contrasts - Copics vs Watercolour


So today is a doubly sad day - not only is it the final day of our stamping contrasts series, but it is also the final post from our fabby DT Member Lydia who is leaving us at the end of the month.  I know lots of you love Lydia's work and she will be back for regular visits we hope, but I'm sure you'll love our new DT member too - we're keeping her under wraps for now but she will be revealed next Friday when she steps into Lydia's shoes :-)

Anyhow - Lydia's swansong is a stunner - along with Kate she is showing how versatile the stunning Magnolias for Her set from Altenew can be.  Today's contrast is all about colour with the different looks you can get from Copics vs Watercolouring.


Lydia


For my card I used Altenew 'Magnolias For Her' and masking to create the flower cluster, I first stamped in a light grey ink and coloured my images in with Copic Markers, and added a little shading with pencils. Once I was happy I then stamped over the image again and heat embossed with gold embossing powder.

For the sentiment I used 'congrats' from Winnie & Walter 'The Big, the Bold and You' and the rest of the sentiment was from Altenew 'Dodecagram'. 

Kate


For my card i have used watercolours and the spotlight technique. 

On my card base i stamped the flower image multiple times in black archival ink.  Then i die cut the circle using Lawn fawns stitched circles  and placed it on the  card and stamped over just matching up the images underneath.

I love the soft flowing look of watercolours and let the colour just run where the water was.  The circle spotlight section was popped up with foam squares.

To finish i added the sentiment from the same set and some clear sequins.

http://www.makethedayspecial.co.uk/shop.php#!/Magnolias-for-Her/p/39242291

Have we inspired you to join in the fun?
If you fancy having a go and challenging yourself to stamp a contrast along with us then link up your entry below - just pick a contrast from any we'll be demonstrating this week and make your own.   You could either make 2 cards to show the contrast or just choose one of ours and make the contrast to match it (so choose Lydia's copic coloured card and make a project coloured with watercolours like Kate did with whatever stamps - you don't have to replicate the project - just the contrast of using the the different colouring medium as your focus)   We'll leave the link open for a week after our final post on Saturday so you have time to see all the contrasts before picking one to join in with and then have a full week to play.   You never know, we might even find a prize for the best contrast ;-)