Showing posts with label Lawn Fawn Peace-Love-Joy. Show all posts

Monday, 6 October 2014

Coloured Christmas Cards...part 2


Hello again :0)
I hope you all enjoyed Colouring week on the blog and managed to find some crafting time on World Card Making Day this weekend.... I certainly enjoyed all the projects and colouring tips from my fellow teamies :0)

Well I'm back today with the last two cards of my Mini Christmas card set and the box to store or gift them in ....

This is my favourite card of the set...so simple and cute!! The little plump penguins fit so well into the sentiment which has been diecut using Finley's ABC's... twice to create a shadow to each letter too. The ice patch is embossed onto vellum and easily adhered by disguising the glue behind the penguins and letters :0)


For this card I've used last years winter bunny and he's having some fun in this snowy scene. To make the sky I've used a promarker in the Tim Holtz spritzer tool and a bumpy mask to make cloud shapes. Instead of adding a sentiment I've used the 'Be Merry' stamp to make a repeated tone on tone background for interest.


To decorate the box I've used the penguin design again and just changed up the sentiment. 

To make a box I wandered around You Tube and Pinterest to find a good tutorial that I could adapt for the size of my card set and found this style, so this design is certainly not my own but I have made and photographed a net shape to show you. You can make this easily from a piece of A4 cardstock (I've used Crumb Cake by Stampin Up)

 1. You need to trim your A4 card to 11.5x8 inches and the drawing below shows the increments to score at.

2.The green areas in the photo below show which areas need to be cut away and the dotted lines are to be folded and burnished with a bone folder
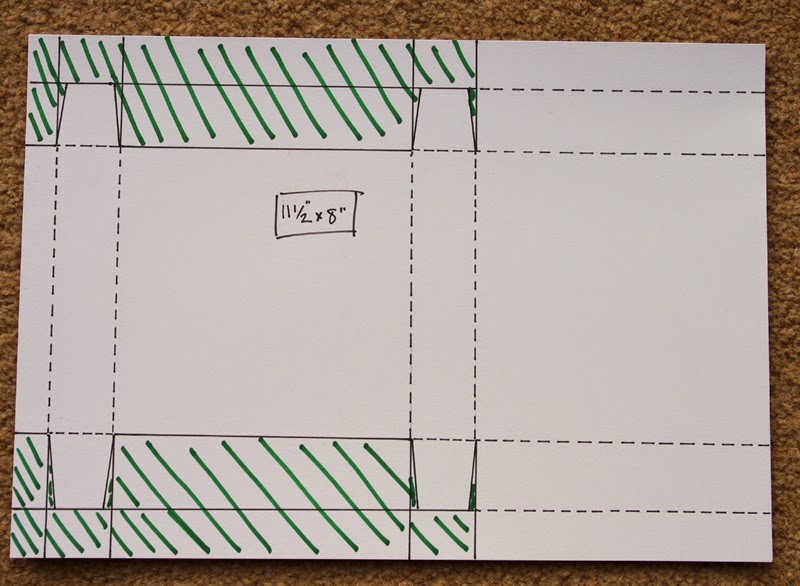
3. Your net shape should look like this after cutting and folding, it's easier to use a circle punch at this point to add a notch as shown in the photo, this helps with opening the box. I've also rounded the two corners of the top and bottom flaps.

4. Fold the left end in and apply strong glue along the back of the narrow strip then folding where indicated in the photo below bring the right hand side across and adhere the box sides together.

I hope that all made sense and you should have a lovely little box that measures 4.5inches square and an inch deep. The cards and their envelopes fit nice and snug in the box... if you didn't see my blog post last week showing the first three cards you can find it here ..this is the set of 5 designs

Well that was another marathon post...well done if you made it to the end.
Don't forget to check out our latest challenge here and also it's Anything Goes week over at Paper Smooches Sparks this week, here's my DT card using Falling for You, Spring Fling and I Heart Art.
It would be great to see you in the gallery for both challenges...you could even be clever and combine them :0)

Jenny x


Sunday, 22 December 2013

Another quick gift

Good morning and Merry almost Christmas.

It's super busy here in Sheffield so I have a very quick post today with another quick gift I made for my SIL that hopefully gives you a little inspiration about the kinds of surfaces you can stamp on ;-)


I found these lacework topped plant pots in Ikea - they are tin painted white - and I thought they would be perfect to hold candles as well as plants.   I used the "be merry" border from Lawn Fawn's Peace-Love-Joy set and stamped it using versamark carefully around the pot and then embossed it in silver.  I added a silver tape border above and below and then hot glued a silver scented candle inside  and job done.

It can be tricky to stamp around a circular object so if you're not confident, you could stamp onto tissue and use studio multi medium  (matte) by Claudine Hellmuth to adhere it and you won't be able to tell the difference!

Right I really must get on so I'll love you and leave you.  Have a very Merry Christmas and I'll see you on the other side.

Tara
x

Sunday, 1 December 2013

Merry Scraps

Sunday is here again - is it just me or does it come around quicker the closer we get to Christmas???

I'm definitely in full on Christmas card mode at the moment, which means I've used a set that's come in and gone out of stock again - Peace, Joy, Love from Lawn Fawn - so I'm sorry if you haven't got it but I hope this is a bit of inspiration if you did manage to snag a set.


I decided to raid my scraps box as it's so full the drawer won't close again!   So I pulled out a selection of scraps in blues, greens and grey and trimmed them to different thicknesses to create my own striped paper.  Once happy with the arrangement they were glued down and the edges trimmed flush.  I then used 4 elements from the set - a single tree stamped in white at the bottom overlapping to create a border, the Be Merry border and fairy lights border were stamped and embossed and then the snowflake border stamped twice at the top.  All that was needed then was a little stickles in lights and hey presto - a card from scraps.

If you're the organised kind who likes to make your Christmas cards all year around, then keep an eye out for this set coming back into store early in 2014....