Saturday 28 February 2015

Colored Pencils on Kraft Card Stock with Wplus9 Botanical Bunch

Hello readers, it’s Julia!

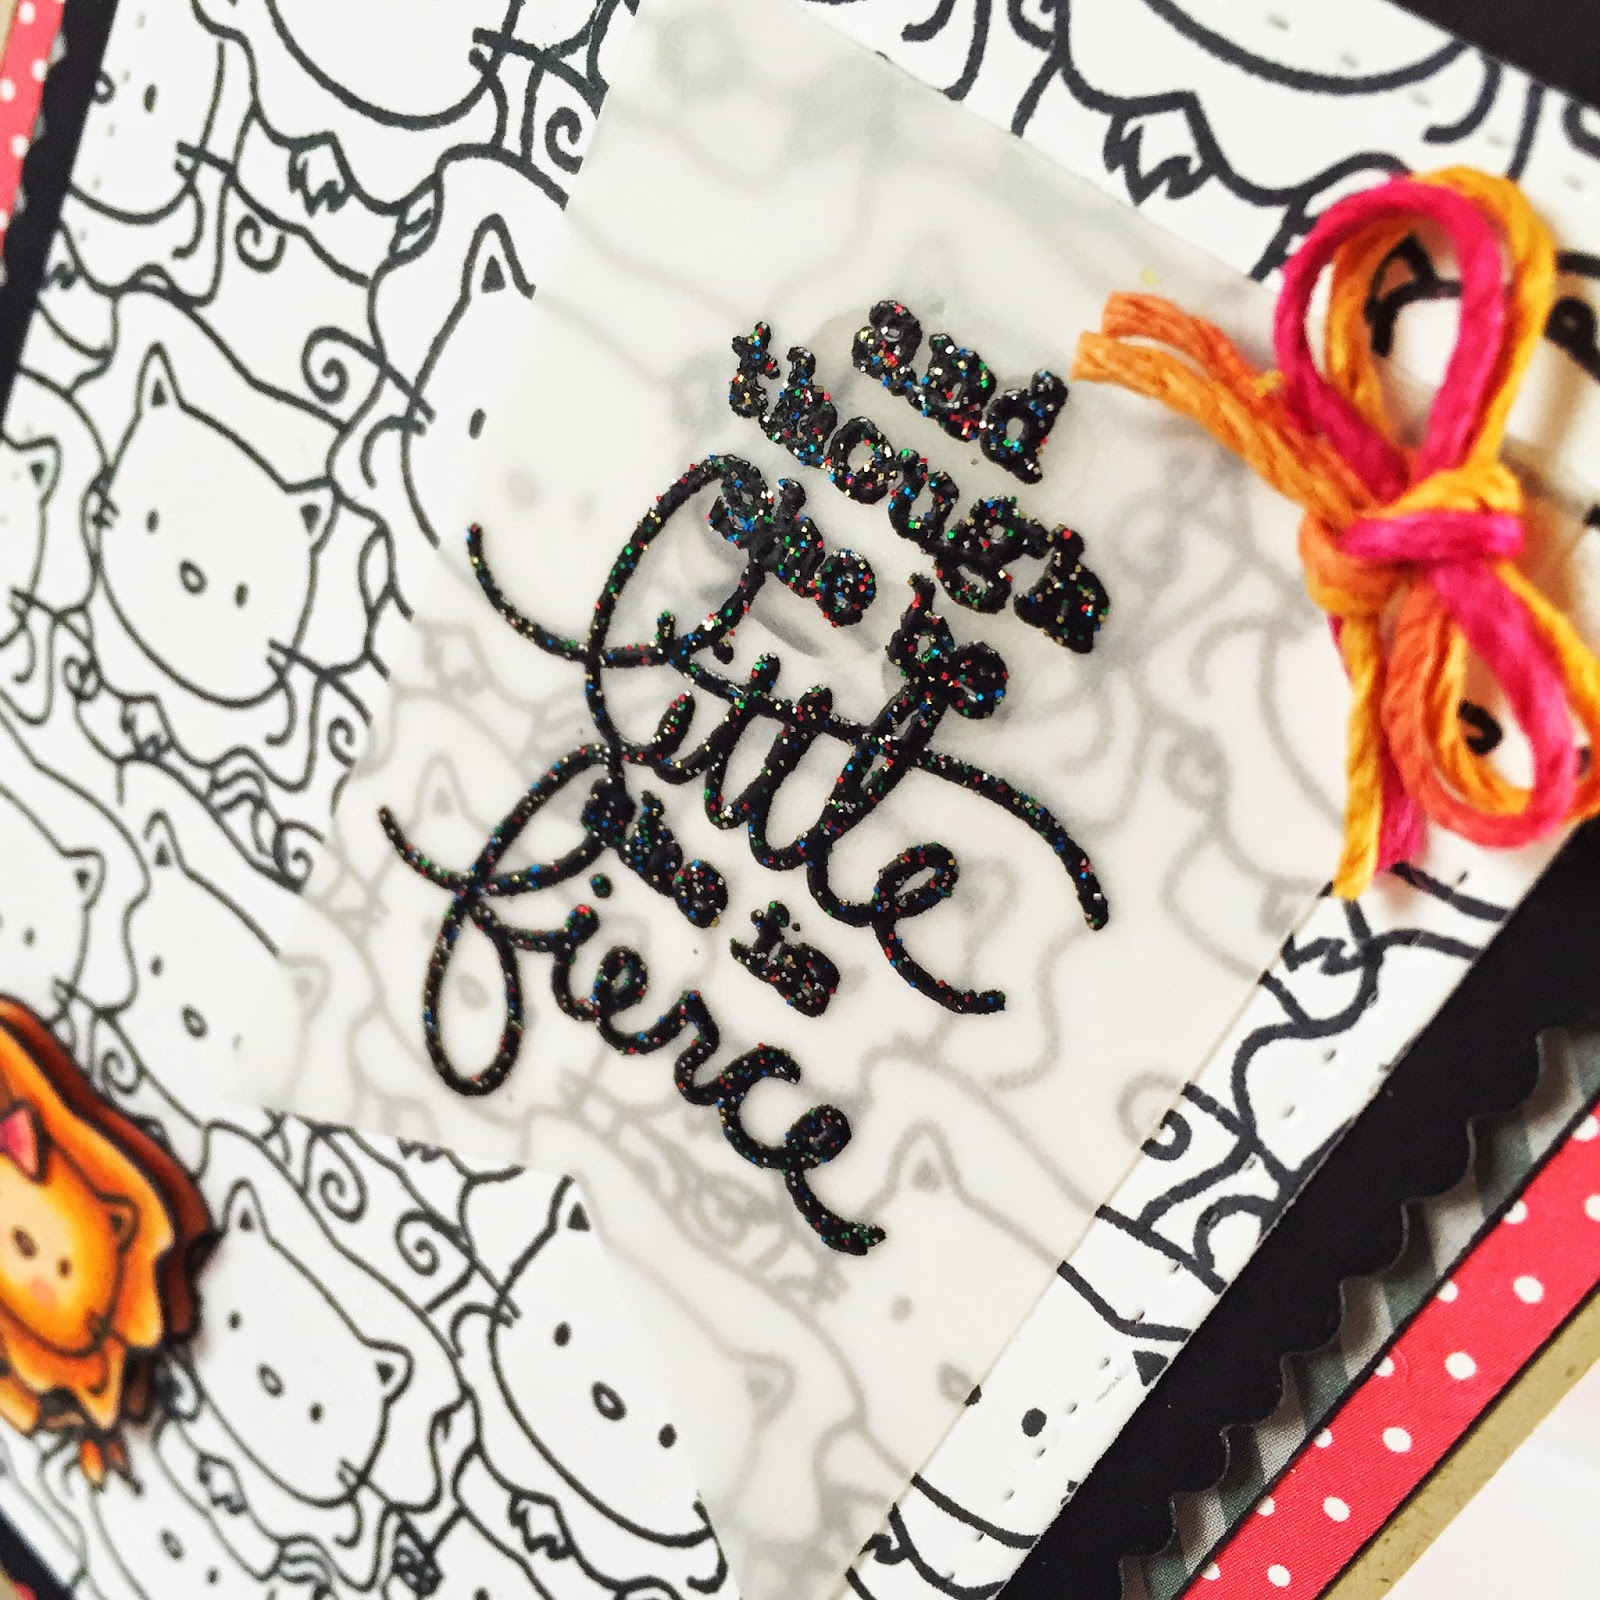
Last weekend, I pulled a few new goodies out of my mailbox and I don’t know about you, but I just like to stare at the pristine stamps and dies and inks for a bit. “Polymer induced stupor”. I think this should be a medical term.

For today’s card, I decided to play with the new and gorgeous Wplus9 “Botanical Bunch” set. At first, I wasn’t even sure I wanted this set, but after seeing a few samples across the net, it went on to my “must have” list. I’m using Prismacolor pencils to color the image.


If I may say so without sounding pretentious: I love how the coloring turned out. I never thought that I could use Prismacolor pencils without a blending solution. If you use a blending solution, all the stroke detail will go away – and that’s totally ok if you prefer that look, but it simply never occurred to me that the stroke detail could be used as an artistic element. So, happy to have learned that and eager to try it on other images.


I hope you enjoyed the card and you’ll give the stamp set another look. There are currently quite a few sets available over at the Make The Day Special Stamp Store and I know for a fact they all long for a loving and caring home ;)

PS: If you want to see in detail how I colored this image, hop on over to my blog (you'll find the link in the sidebar) and check out the video!

Thanks for stopping by!

Friday 27 February 2015

Sketchy Spotlight Stamping


DSC04098

I firstly cut my card panel using the stitched frame from the Mama Elephant ‘Basic Die Set’. Using the largest of the Wplus9 ‘Clear Circle Stackers’ I drew around it where I would eventually cut it, but before die-cutting a circle window I stamped the sentiment from Lil Inkers ‘The Fine Print’ into the centre of the circle. Once the sentiment was in place I stamped some floral clusters using Wplus9 ‘Pretty Little Peonies’.

DSC04097

Once I was happy with the flower arrangement I then added the circle die back into place and run it through my Big Shot. I then took the circle die-cut and stamped the detail parts of the flowers only on to this piece.

To put the card together I added the large stitched card panel to my card black using foam tape, once this was in place I added the circle piece through the die-cut window and attached this flat to the card blank.

DSC04102

I would really love to know what you think of my card!

I hope you have a beautiful day and I will see you again soon.

Hugs Lydia xxx

The Fine Print  Clear Cut Stackers:  Circles
Basic Set - Creative Cuts  Pretty Little Peonies 


Thursday 26 February 2015

Cute Birthday

Hello, Sarah here with a cute birthday card made for my nephew who is turning 5.  It was the perfect opportunity to ink up my Paper Smooches Cuteasaurus set :)


Aren't these dinosaurs adorable?!  I decided to paper piece them and combined them with the Mama Elephant Landscape dies to create a little scene.  I used the cloud die as a stencil to create some light blue clouds in the sky.  The Paper Smooches Digits set was used for the birthday sentiment - love the fun and quirky fonts on the numbers in this set!

I had real fun putting this card together....I hope my nephew likes it :)

Thanks for stopping by,

Sarah x


Cuteasaurus   Digits    Landscape Trio Creative Cuts

Wednesday 25 February 2015

Lots of Luck


Hello.
This smaller set, Lucky charm is just perfect for wishing anyone some luck.
Full of images that represent lucky charms you can use them so many ways.
I have two looks, the first is very busy with lots going on. 
I used the cat image and coloured with colour soft pencils. the die cut cat is then layered on the stitched circles from Lawn Fawn.
The background is lots of the other images stamped in Avery Elle inks.
I finished with some clear sequins.


Next i have a very clean and simple one layer card which is just as effective for wishing some one luck.
I stamped in black momento ink and coloured with colour soft pencils direct on to my Kraft card base.
The sentiment is stamped in black archival so that it stands out more.
It was kinda tough not adding anything else but I am glad i didn't i think ant more would have ruined it.
Thanks for looking.


Lucky CharmLucky Charm Lawn CutSmall Stitched Circle Lawn CutsLarge Stitched Circle Lawn Cuts

Silver Fox Pigment Ink PadDaisy Ink Pad

Celery Pigment Ink Pad Fog Pigment Ink Pad

Tuesday 24 February 2015

One Fierce Guest!

Jill's guest post was so inspiring last week, so we've invited her back for a second spot this week and she has a fierce little card to share:

Hi everybody,

It's Jill here with my second, and last, guest spot, so I thought I'd do something fun and a little bit quirky.

I was going to use my new stamps from Mama Elephant's recent CHA release (Oh my word, the 'Three Amigo's' though...), but obviously you all fell for them as quick as I did as they sold out in no time!  So I thought I'd re-visit some of my all time favourites instead.  [Word is they are on their way back though!]

And here's my card...


My little lioness is from Mama Elephant's 'Cosmic Stars', and my sentiment is from Mama Elephants 'Everyday Greetings', which has to be one of my all time favourite stamp sets, just so many great sentiments and inspiring words, done in such a cool style.  Now this card took a whole lotta masking, but I like how it turned out so was worth the patience (which is not my forte!).  I started by stamping out my lion several times onto masking paper and cutting out. I then made my background up by stamping the same little fella over and over, masking as I went.  I also stamped the same image out on a separate piece of card and coloured using alcohol markers, adding a little bow, to turn my 'he' into a 'she' (stamping can make life so much easier can't it?).  I stamped out my sentiment onto vellum, heat embossed in a Black Sparkle powder, and cut into a wee banner.  I embellished with some Lawn Fawn twine, and built up my layers using Mama Elephant's 'Index Card' dies and some Lawn Fawn patterned papers.  I used foam tape to adhere my lioness over one of the previously stamped images, which I had also coloured, to really help her 'pop'.  This card is about not being afraid to stand out from the crowd, and I really hope you like it.  I can't tell you how thrilled I've been to step in as a guest, and thank you so much for taking your time out to read my post, it means the world!
Love always,
Jillxxx

Monday 23 February 2015

Watercoloured florals

Hello there :)

I had planned to share a couple of Paper Smooches cards with you today but then my Mama Elephant goodies arrived and I just had to try out the Freestyle Florals stamp set instead :)

Even though there has been a flood of floral stamps recently, these bring a fresh feel with the sketched outlines and they appealed to me instantly...


 This card started out as a one layer card by masking around the edges of a square card base and stamping the flowers inside the masked area. I watercoloured whilst the tape was still in place ( I use Frog Tape because it doesn't allow seepage underneath!!).. the only problem is I forgot it was ordinary card so it warped too much for my liking, hence a quick change to matting and layering :) I used distress inkpads squished onto an acrylic block to add colour.

This next card was inspired by a monochrome challenge and my love of green!!

hhmmmmm.... the jury is still out on this one, I used proper watercolours and definitely need more practice with them!! This is watercolour card which is trimmed and adhered to a card base and the sentiment is is one from Avery Elle's So Happy which is embossed onto a strip of vellum. I love how the vellum softens the edge between the florals and the green card.


Here are the links to the stamp sets I used

                       Freestyle Florals   So Happy   Salutations

Just a quick reminder that it's a sketch challenge over at the Paper Smooches Sparks  this week... I used Sunnyside Up, Cloud dies, Quote Tag dies and We Totally Click for my interpretation.
It would be great to see you play along with us too :)

Jenny x

Sunday 22 February 2015

Otters and Elephants

What a week it's been at store HQ - we've never had so much stock arrive at the same time and it's been a little tough - there have been a LOT of late nights and early mornings to get through it all and this weekend looks like more of the same as Lawn Fawn's latest release is flying out of the door so fast!   I know some items have sold out already but I now have a faster shipping method available for some of the larger brands so if Lawn Fawn haven't sold out I will get in back again next week ;-)

I have managed a couple of quick makes with the new stock - firstly my personal favourite from the Lawn Fawn release which is the otter from the Year 5 mini stamp.


I used the stitched circles dies (both large and small together to get a nice thin mat) to cut the circle to stamp him on and a mat from the beachside papers.  I used their new black licorice ink, which does give a brilliantly crisp image, but it does take a lot longer to dry than standard dye ink pads so do take note of that when you use them or you could smudge your lovely work.  The colouring was done with pencils and blending solution.   I used some more of the yummy new papers to finish it off.

The really exciting news is that we have already got the new Avery Elle release in store - I can't sell it yet - but I can play with it ;-)    So here's a little taster of what will be available on Friday!

The Wplus9 elephants were so very popular and sold out in about 4 hours, so if you missed out, then let me introduce Elle - isn't she adorable!


She is stamped directly onto one of their new range of A2 cards which come in packs of 12 with 4 cards in each of 3 colours which match their ink pads (and yes we have the new range of those too!)  This one is from the range called Sugar.   These cards are such good quality!   Really thick card stock - so much so that I water coloured Elle directly onto them and there wasn't a hint of warping or pilling (I wasn't heavy handed with the water though - I used distress inks and a water brush on my craft sheet)   The little balloon is paper-pieced using one of their new pads which again co-ordinate with the inks and cards - this one is from "happy"     Another simple design, but hey - it's been a busy week - I didn't have time to get Picasso on you ;-)

NEWS FROM THE STORE:

New arrivals this week if you missed any were:

  • Mama Elephant
  • Wplus9
  • Paper Smooches
  • Lawn Fawn

Avery Elle will be on sale as soon as its released on Friday

Altenew are just waiting for some stock to arrive and then I will arrange a speedy shipment

I will get restocks back as soon as they are available...........

MAKE SURE YOU REGISTER FOR ANY ITEM THAT IS OUT OF STOCK USING THE "EMAIL ME" FUNCTION.   Not only does this mean you get an email telling you when it's back, it also lets me know how many people want each item so I make sure I order enough for everyone!


Saturday 21 February 2015

Is It Spring Yet – Get a Head Start with Lil Inkers

Hello crafters, it's Julia!

And I have to make a confession: I want color. Rich, vibrant, stunning, glowing colors. Maybe it's because of the mostly grey winter weather here in Germany, but I'm craving color. Don't get me wrong, I love snow, but … color! I miss it! So, I'm taking my Stabilo fibre tip pens again for a spin and today I'm showing you just how vibrant a color blend you can get with them.


I've showcased these pens already last week here on the blog, using them on a tiny image. Today, I'm coloring an entire card panel with them and while, yes, it took a while, I find it's super relaxing after a long day at work. The stamp set I used it one of my favorites, yet underused ones from Lil' Inkers: Modern Mehndi.


Using water color paper and Archival black ink (anything that's permanent and works with water color, too), you can stamp your pattern and then start coloring. I went with warm and lively colors to brighten up my day and the day of the recipient of this card.


If you want to see how exactly I colored the images, hop on over to my blog for a video tutorial (you'll find the link in the sidebar) after checking out all the products I used below.  As always, I'm also listing alternative products if anything is out of stock currently or if I think another product would work with this technique as well.

Thanks for stopping by and have a wonderful weekend!

Friday 20 February 2015

Fresh Florals

DSC03834

I definitely have that Friday feeling today… although truth be told I had it yesterday as well, with the kids off school I kinda lost track of days.

Today I have a card to share using the Wplus9 ‘Pretty Peonies’…. I am so glad that the re-stocks of these have arrived at Make The Day Special so I can share lots more ideas using these gorgeous stamps.

DSC03831

I have used Hero Arts for all of my floral stamping, Soft Cantaloupe and Fresh Peach for the large flowers, Green Hills for the leaves and stems and a mix of Butter Bar and Mint Julep for the additional buds and berries. Once I had stamped all of my florals I thought that it was missing something so I took a tiny circle stamp and filled in the gaps within the floral arrangement with the same colours I had already used, a stamped these out past the images but more spaced so it looked like they were fading.

The gorgeous sentiment is from Avery Elle ‘Fabulous Florals’ I just love the font of this, I stamped in black and then stamped over the top with VersaMark and heat embossed with clear embossing powder to make the sentiment pop.

I would really love to know what you think of my card!

Hope you have a beautiful day and I hope to see you again soon!

Hugs Lydia xxx


Pretty Peonies      Fabulous Florals   Butter Bar Shadow Ink   Fresh Peach Shadow Ink  Green Hills Shadow Ink   Mint Julep Shadow Ink   Soft Cantaloupe Shadow Ink