Saturday 30 November 2013

Happy winter


Hello.
I have been having a play with Into the woods from Lawn Fawn.
This little guy sold out very quickly but this idea will work with almost any lawn fawn stamps.
I started by die cutting the panel using the Stitched journalling card ....i can see this getting a lot of use :) 
I then kept the die on the card once cut and stamped the wood panel from Wood grain backdrops ...you all  snapped that one up super quick too lol.
I stamped in Sahara sand and then sponged some of the same ink around the edges.
I then used some of the new Gold sparkle Lawn trimmings and wrapped it around the card three times and tied a bow.
I stamped the little critter onto Sahara sand card and once cut out sponged the same ink around to give some shading. 
For the ears i used a pink copic pen to add some colour and then a white gel pen added some dots on his back.
The Snow flakes are from Critters in the snow, they are heat embossed in neon blue on vellum and i added a little sparkle for the centres.
Thanks for looking.


Friday 29 November 2013

Milk And Cookies For Santa

Instead of sharing a card with you today I thought I would mix it up a little and share with you what we will be tying around Santa's glass of milk (or Baily's ;) ) this year. 


This tag is a beautiful mix of Lawn Fawn and Wplus9- two of my main stamping addictions at the moment.

Firstly I die cut Lawn Fawn's Stitched Journaling Card and inked the edges using Antique Linen Disstress Ink. I then used my favourite background stamp 'Woodgrain Backdrop' (sorry currently out of stock) to the bottom of the tag to act as a table and inked this using a blending tool and Tea Dye Disstress Ink. The sky is Tumbled Glass Disstress Ink ..... and although you can't see them very clearly from the photo there are some snowflakes in the sky from Yeti Set Go set. 

For the main image of milk and cookies I used the Wplus9 set bearing that name (Milk And Cookies and dies). 

For the finishing touch I added 'For Santa' using Sally's ABC's and some twine so I can attach it to the big man's drink ;) .

I hope you like this little idea and maybe give it a go yourself!

Hugs Lydia xxx


Thursday 28 November 2013

Merry Christmas!


Hello.
Another Christmas card ticked of off my list :)
I am having trouble getting good photos at the moment.
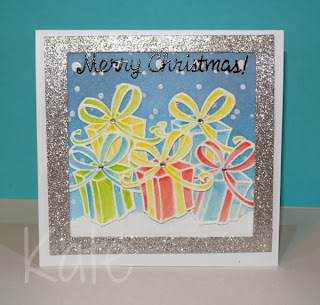
Lots and lots of heat embossing here. I heat embossed all the presents in white on watercolour paper before colouring with inktense pencils and water.
The background is distress inks with even more heat embossing using the snow and stars stamp from let it snow.
The presents are form Lawn fawns Bows and holly set.
Thanks for looking.

Tuesday 26 November 2013

Mystery Christmas Set!

Morning, morning! I was hunting through my sets and decided to do a Christmas card but using an utterly non seasonal set. Guessed which set?
http://www.makethedayspecial.co.uk/shop.php#!/~/product/category=3351881&id=24370300
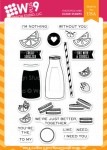
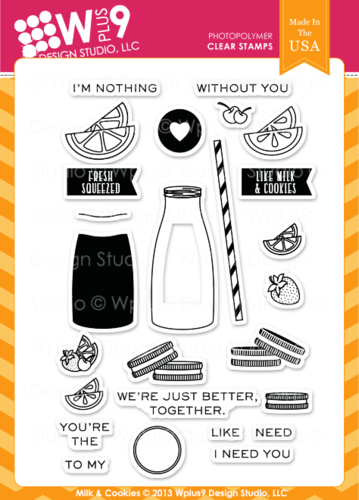
Milk and Cookies! So which other sets did you use, I hear you ask? None! As soon as I looked carefully at the set., I saw the straw and immediately thought candy canes! Due to the perfect flexible nature of the photopolymer, these babies can be curled & altered. I really took the straw to the max- it only just stayed in that position. Once I curled and stamped to the left, I curled the other way & stamped again.
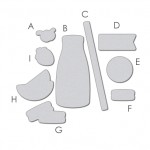
I trimmed out most of the middle of the milk bottle & around the edge, so we could see the canes showing through.
The wreath? How did I make that? See the closeup...
I used these two elements-


The little circle is the centre of the wreath. The single line (which is normally used as the meniscus) 
I simply curved around a little on my block and put one end on the circle & just systematically moved it around.
Just shows how with a little sneaky thinking you can create something completely unintended from the set.
Go and twist your sets! See what you can come up and PLEASE post a link - we would seriously love to see how you do it too!

Until next Tuesday!

love Keren xx

Monday 25 November 2013

Fintastic Fish!!

Hello there :0)
It's Jenny here and I'm back with a Paper Smooches card again today, my last DT card for the Paper Smooches Sparks Challenge as the new design team take the reins next month.

I've used the stamp set called Briny Blue to make a mini underwater scene....

The exotic fish are great fun to colour in the brightest Promarkers you have and the tiny bubbles are dots of Glossy Accents.... they seem a recent obsession of mine :0) 
I had a go at making my own enamel dots the other day using black enamel accents by Ranger on a craft sheet and although a lot flatter than the real thing they look quite shiny and round...almost like ink drops. I added those just to break up the white space a bit.... love how they reflect the light :0)

To see the photo inspiration at the PS Sparks blog click here....hope you can play along too this week.
Thanks for stopping by :0)
Jenny x

Sunday 24 November 2013

Wiggle It!

Good morning all - I'm feeling in a masculine mood today - I think it must be all the Dr Who we were forced to enjoyed watching yesterday.....

So I've been playing with my favourite masculine stamp set Fish More and the companion die set.


I went for a faux embossing look by lining all the die cuts up across the card in rows and then added colour by stamping on top in a variety of blue and green inks.  Trimming off any die cuts that overhang the edges of the card.  For the sentiment I used a strip of vellum and embossed it with an opaque blue powder.  I also embossed the hook in silver before adding the fishing line both on and off the vellum with versafine.  There wasn't anywhere really to "hide" adhesive behind the vellum, but wackytac tape is pretty much invisible (I have a strip the whole way across) so that's a really handy addition to your craft stock if you want to use vellum and aren't handy with a sewing machine ;-)


Have a great week - I'll catch you next time.

Saturday 23 November 2013

You Made My Day

Hello! It's my Saturday turn again and I thought this time I would try keeping it simple and make a little card to express gratitude with a little extra "really"!
I love all the greetings by Avery Elle - the quality of the stamps is second to none - and the font works so well with different styles of cards.  So here it is...

The heart is from the Create Today set by Unity.  Again, the quality of the image is perfect.  This is a lovely set with wonderful sentiments which are truly from the heart.
 
Hope you like it!
 
Tracyx

Friday 22 November 2013

Comfort And Joy


So it's my day to post over at Make The Day Special- did I tell you guys yet that this is my most favourite place to buy my photo-polymer fix from. For us over in the UK this is a heaven for those hard to get stamps from the US. I know of no other place in this little island of ours where you can get my faves Wplus9 and Mama Elephant :) 

Today I have used my favourite Christmas stamp set of the moment- Wplus9's 'Heartfelt Holidays'...... I just can't believe how versitile this set really is, it's not just for Christmas, this little baby can be used throughout the year! Here's just a little card to cheer someone a little....


 There is also an other sentiment that could be used 'Warm Wishes' that would also work perfectly well on this card. 

After masking off and inking the top and bottom of the card in a wheat chalk ink, I stamped over this in the same colour with the two mugs stamp which gave this subtle watermarked background. 

To line up the sentiment on the popped up cup - I firstly stamped the sentiment onto the base card, then laid a small piece of scrap plastic over this placed the cup where I wanted it to be and then stamped over the first sentiment. You can then throw away the piece of plastic and pop up the cup which now has the part sentiment on it.

Really hope this has given you some ideas what you can do with this set that will be in the Make The Day Special Store very very soon.

Hugs, Lydia xxx

Thursday 21 November 2013

Folky Christmas Tree

Don't die of shock but... I'm back!!!! Yay the little ones seem to be at the end of their nasty sickness bug and I think my mojo is slowly returning.. woot woot :)

Can you believe how quick this year has gone?!?! It seems that Christmas has just snook up and shouted boo in my face, it is everywhere. Not that I'm complaining I LUURRVVE Christmas and the magic of the season. Me and the little ones are already watching Christmas movies.. a bit early I know as I usually wait until the 1st December but as the kiddos have been really rather sicky we have watched a couple to cheer us up..hehe.

I was taken with the inspiration over at Cas-ual Fridays this week so as the wee-ones napped I had a bit of stampy time :-D....


The inspiration I took from the photo was the christmas tree and those fab cool yet heartwarming colours. 

The gorgeous folkish tree, laurel wreath, banner and sentiment are all from the same beautiful set- Heartfelt Holidays from Wplus9 (these will be in the Make The Day Special store at the end of the week!). This is such a fabulous set - so versatile and there is so many more images and sentiments to play with! I haven't even scratched the surface on what you can do with this set, hours and days of fun left in this one :)

I also created the striped background using Avery Elle's 'Knotty' set. The stripes are so so useful on this set to create backgrounds for every style of card. 

Thanks for popping by, please let me know what you think and also a link to your latest card I'd love to see what you are creating!

Hugs Lydia xxx

Monday 18 November 2013

A Floral Arrangement

Hello there.... Jenny back again :0)

I was really hoping that the Wplus9 stocks had arrived before I shared this card with you but I think their arrival is near so I'm going with it anyway..... some of you will already have the Fresh Cut Florals stamp set and dies anyhow and I just wanted to show you how well they go with some other UK branded dies!!!


To echo my team-mate Lydia, I really don't think you can go wrong with these stamps and dies.... anyone can excel at flower arranging and I hope the 'boss' doesn't mind me posting a link to these Joanna Sheen dies which are the perfect companion ;0)
I love the trug, it's the perfect size for the flowers and I have the hanging basket too but just haven't got round to making a card with it yet.... watch this space is all I can say :0)
This was hubby's birthday card....him being a keen gardener this was definitely hitting the right spot..... if Wplus9 could just bring out some vegetable stamps and dies now I would be in green-fingered heaven :0)

Thanks for stopping by and I hope you have a good start to the week!!
Jenny x

Sunday 17 November 2013

Cosmic Calendar

One of the reasons I bought the Cosmic Stars set from Mama Elephant was because I thought it would make a really cute calendar.  I have some desk calendars holders so I used one of those and I intend to make a few more -  they're a lot quicker and easier than you might think and make really inexpensive gifts for Christmas ;-)

I'll not fill the blog with 12 pictures - you'll get the gist from the couple here:


The actual calendar part is a free printable I found on the internet (here) and I just saved them as pictures and added them to a table in a word document where I sized each "cell" to the size of my desk calendar and then printed them on copic colouring card.

Then it's just a case of stamping each star sign to the left, adding the name from the starry nights companion set underneath and colouring in the images - you could easily knock out half a dozen in an evening I reckon.

That's all from me this weekend folks - enjoy the rest of you Sunday.
Tara

Saturday 16 November 2013

Happy holidays


Hello.
I'm here with more Christmas inspiration :)
I  have used all Lawn Fawn products for this card.
I used two non Christmas items firstly the Blissful botanicals dies and matching stamp for the wreath although you don't need to have the stamps for this.
Secondly i used Lunar lights turning the lanterns into baubles ....if i had of organised ,my stamps better i would have used Ornate ornaments.
The sentiment is from Bows and holly.
I kept everything very simple colouring the baubles with distress inks and adding a touch of stickles.
Each part of the wreath was dabbed with ink around the edges.
Don't forget you can see all Christmas stock here.
Thanks for looking.

Friday 15 November 2013

Merci

So so sorry for the stupidly late post ... but better late than never ;)

I thought that I would have a play with some Avery Elle sets today and both of the sets I used for this cute little thank you card are in stock, yay!

The sets I have used are Knotty (for the stripes) and Petals and Stems for those gorgeous blooms and the cute little 'merci'.


   I can't tell you how much I love love love these stunning flowers! 

They are such a great size so they can be used for scrapbooking and don't look at at lost on a 12x12. 

Thank you so much for popping in!

Hugs Lydia xxx 

Wednesday 13 November 2013

Christmas duo

 Hello.
Another two Christmas cards from me today. :)
The first using CAS_ual Friday's.


I used the new Funky round tag fri-die and Naughty or nice stamp set.
I die cut the bauble using the large tag on glitter card and used the funky shape...which i think can pass for a snowflake to cut out the centre.
The smaller circle was used to go on the back....after i stamped and heat embossed the same shape from Exclamations which is currently out of stock.
I used  blue ribbon and then matching ink to stamp the shapes under the sentiment.


This card uses Paper smooches.
The leafy greens set is just perfect for creating holly.
The paper panels are Echo park dots and stripes Christmas.
I have followed the sketch from Paper smooches sparks challenge.
Thanks for looking.


Tuesday 12 November 2013

Amazing Arrows!


Morning Morning!
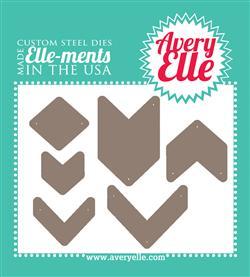
Hope you're having a fab Tuesday! Today- thought I'd go with arrows. Strictly speaking those diecuts are 'chevrons'!

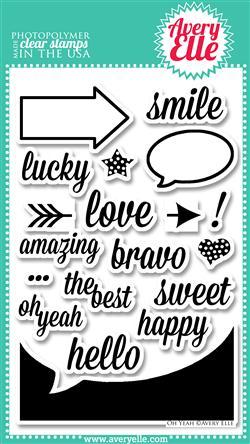
They're such great little dies- you can place them all over your card/scrap projects. The stamps are these...

There are plenty of these sets in stock. When did the cooler cousin of arrows become chevrons?!! It's a great little combo for using up all these tiny scraps that admittedly I do chuck away. My house is full enough without teeny bits of cardstock taking over the place.  Lou knows a good set when she sees one. Go rescue them from the warehouse & give them some ink!

It's a little 'in your face' I know! Bright cards never hurt anybody- right?! I'm starting the day Happy- as I mean to go on!
Hope your day gets happier too!

Love, Keren x

Monday 11 November 2013

A Christmas Bauble

Hello there :0)

I'm back with my usual Monday morning Paper Smooches blog post because I'm sharing this card on my own blog for the new PS Sparks challenge. This week it's a sketch and I've gone back to Christmas mode and used the fab set called 'All Yule Need'.


I love contemporary colours at Christmas just as much as the traditional hues and heat embossing the bauble in white just makes that teal colour pop!! The Hot Spots die is actually really good as an interesting background panel especially when using patterned paper and the aperture has white vellum behind it so I could adhere the lettering to it. The sentiment is from a new set of dies by Paper Smooches that will be available to pre-order soon. The large 'Christmas' is in three sections which is why I needed the vellum to help it span the gap.

Thanks for popping by today and don't forget to visit the PS Sparks blog and play along with this weeks challenge :0)
Jenny x

Sunday 10 November 2013

Christmas Peas

Is it Sunday again already?  Hope you're all having a great weekend.

I needed to search for a little inspiration for my make this week so I chose to play along with the "stripes" challenge at Paper Smooches Sparks and as I have this fabulous candy cane striped washi tape I immediately thought Christmas.  However as I don't have any Christmas Paper Smooches I had to think a little outside the box......


I thought the "Peas, Love, Happiness" sentiment in the Vegtastic set could lend itself to Christmas so I opted for Christmas Peas!  I stamped the peas on scraps of green card, added shading with copics and fussy cut.  I put a strip of washi down some white card, stamped the pea tendrills and stuck the pods in place before stamping the sentiment in versamark so it worked over the washi.  I stuck more washi onto a scrap of white card and trimmed a couple of thin strips from it.  All were then mounted onto a small red base card.

Until next Sunday - Peas out!


Saturday 9 November 2013

You're the Best!

Hi everyone!  I've been busy playing with sets from a mix of companies this week - variety is the spice of life so they say!

I have the Love Birds stamps and matching dies from WPlus9. I love these! But I've not had much time to play with them so far.. so I thought I would use these for the main focus of my card this week. I've used the stems in the set to create a dark silhouette against an inked background - then just added the die cut bird as if he's gently perched on top.
The background stamps are from Mama Elephant Basic Borders (this is such a versatile set!), and the greeting is Avery Elle Handwritten notes (I love this font and the clear/crisp image you get!)
I hope you like it!
 
Tracyx
 

Friday 8 November 2013

Noel


Hello.
I have another Christmas card for today.
I made the sentiment for this card using Quinn's capital ABC's and Bows and holly both from Lawn Fawn.
Everything has been heat embossed with in an inch of its life lol.
The letters are coloured with copics and the wreath was coloured with distress inks and inktense pencils.
I also used the let it snow set  for the snow drift which was also embossed.
I finished with some tumbled glass distress ink and dylusions white linen spray inks.
If you are still deciding on your Christmas supply's why not check out our Christmas section.
Thanks for looking.

Wednesday 6 November 2013

Chilly chums


Hello.
I thought i had better get started on some Christmas cards as we are now into November.
I have used Paper smooches Chilly chums set.
I started by making the background with distress ink then heat embossed some snowflakes from the set
The snowy panel at the bottom of the card is actually glitter card .
My camera didn't want to show you that though lol.
I stamped each of the characters in archival black ink then coloured using inktense pencils and water.
That was the first time i have tried them and would recommend them ....although i still need some practise :)
The sentiment is also from Paper smooches and is in the Joyful greetings set.
If you are looking for Christmas stamps Louise has made a special section in the shop just for it HERE. 
Thanks for looking.


Tuesday 5 November 2013

Summer Strawberries!

There should be a firework themed card today- in the UK we have Bonfire night. Alas, it's so wet and miserable, I thought I'd mix it up and think of warmer times. Strawberries are one of my favourites- and it's easy to miss them on this set
They're not quite ripe- see the yellow- I was trying to shoehorn the sentiment into the images. The idea that the strawberries need something else to be good-not quite bang on- but you can see my logic!!
It's making me think of cream teas, and scones & sitting out looking over the water…
Before I drag you into my daydream- go and check out some of the other sets in Make the Day Special- right now we've a new Christmas section. Lou has cleverly put together a perfect selection of products for handcrafting your Christmas. It's a shame she can't do the same for all my Christmas shopping ;-)

See you next Tuesday!

Happy stamping!

Monday 4 November 2013

A Foxy shaker card

Hello!
Tomorrow is my eldest daughter's 8th Birthday,and so there was much hinting at what sort of card she wanted. The main thing was that it needs to contain a fox,her most favorite of all animals. This is great as we have a few sets of stamps with foxes on. I went with Paper Smooches Chilly Chums in the end,as she is a very cute fox.  I decided to try making a shaker card using old packaging (when you are a hoarder crafter,you tend to keep all kinds of packaging,don't you?) ,a simple enough process unless of course you are rubbish with measurements like me. So below is the method I used based largely on guess work,and loosely on exact ruler measurements. Ladies and gentlemen,I give you.....THE FOXY SHAKER!


The process....
Measure the shape you are inserting and cut a cavity to fit.


When you are happy with your fit,work on the shape of your card.
 

Cut a piece of cardstock for your base. Start arranging all the pieces until you are happy with the position. Keep checking that they all fit in the 'view box' of your packaging.


Once happy with the position and fit,glue eveything in place. Bear in mind some shaken items might get stuck onto things like grass etc.so try to keep it flat!


If you are adding a paper piece to the front of your card,do so now

I left a wide margin on mine to neaten the edges around the cavity. This will narrow the space,so check it all still fits well!


Apply tape to all the areas you want stuck on the inside of the view box card,and glue the view box into place. Put the sprinkles inside the viewbox and lay the backing card with your picture onto the strips. 


Voila! A 3D shaker card fit for a fox obsessed birthday girl!


Hope you could follow that!
Lou