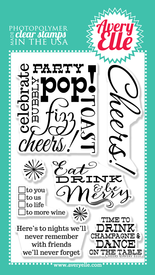
Hands up who had new stamps and dies arrive for the weekend and enjoyed playing with them???? Yay for new stash, I did too but a busy weekend means crafting time eluded me :0( ..... instead I have a card I made using Avery Elle's 'Cheers' stamp set and a photo tutorial for you too, come and see :0)
There's not many large script words you can fit on a card front but Cheers has to one of the best and I love the flowing font used by Avery Elle in this set. It pretty much takes centre stage but I really wanted to use the Hero Arts Tiny Ink Spots background stamp as a fizzy backdrop, I had this project in mind when I bought the stamps :0)
This is a whole lot easier to show than explain so hopefully the photos will make sense of my waffling :0)
This all started because I wasn't sure how well the sentiment would stamp and emboss over the heat embossed background so I made a mask for the 'Cheers' using a Post it Note and then layed out the card to position the mask
I made pencil marks on the back of the gold card so I could line it up on the background stamp because the streams of bubbles needed to be vertical...I know I made life difficult with the jaunty angle but hey!!... I stuck with it *wink* :0) You can see what I mean in the photo below about the pencil lines...
When stamps are this big I put my card to the rubber, so with the mask still in place I used Versamark ink and stamped the tiny spots bkgd before applying powder liberally across the card front, leave the mask in place still at this point because it will protect any glue residue underneath from grabbing the embossing powder!! I used an old Judikins powder called Chablis but clear or sparkly would've looked just as good :0)
Below is what you're left with after tipping off the excess powder and now you can carefully remove the mask with tweezers. You may get the tiniest amount of powder under the mask but its minimal and easily brushed away with a fine paintbrush.
After heat embossing the background you can clearly see the space left for the sentiment.
Now the trusty Stamp-a-ma-jig comes into play to get that sentiment positioned correctly.... It is easier to see than you think :0) I used a 'new to me' combo for black embossing which is the new Memento Luxe ink in Tuxedo Black and Stampin Up's black embossing powder..... Best Result Ever is all I can say. The luxe inks are juicy and slow drying so be careful not to smudge but they're great for embossing :0)
and the finished card again... I love the subtle champagne bubbles and this technique is good for any large 'all over' patterned background when you need some space for stamping a sentiment or image onto them ..... hope the method made sense :0)
Well thats quite enough from me and I feel I did well if you got to the end without scratching your head in confusion.... hope you give it a try too :0)
Thanks for stopping by and please share your cards with us over at our Flickr page, we'd love to see how you're enjoying your new stash :0)
Jenny x


e.jpg)
e.jpg)
e.jpg)
e.jpg)
e.jpg)
e.jpg)

No comments:
Post a Comment