Sunday, 30 June 2013

The secret......

A bit late with this week's card as it's my first bit of crafting this week due to our school summer fayre!

I've used one of my favourite co-ordinating colour schemes of orange and turquoise and dug out my embossing folders.

The sentiment is from Unity's "The Right Words" store kit and stamped using Versamagic chalk ink on to Coredinations cardstock with the heart shaded in with a pastel pencil. 


I hope you're all having a lovely weekend and as always, thanks for visiting!

Saturday, 29 June 2013

Give a Dog a Bone

Hello there... Jenny back again :0)

I've been on my summer hols and yesterday was the first time back in the craftroom...
always a worry in case you find your mojo is still on a vacation!!! I think I'm okay though, a nice 
parcel of Lawn Fawn goodies has helped for sure :0)


The Critters in the Dog Park was one set that definitely made me go weak at the knees when 
I first saw it so it had to be inked up straight away. I've modelled this little chap on our 
Lakeland Terror Terrier although he doesn't wear a red dickie bow 
and I'm not sure if he's giving or receiving that bone either ....I know which he'd prefer !!
Just like our mutt though, he's managed to make muddy paw prints all over the 
place too whilst pretending not to know anything about it *tut tut*

I just love that simple sentiment too, the tall font is so clean and large without overpowering 
the image.. it's from So much to Say.

I hope you've been enjoying your new Lawn Fawn stash too :0)
Thanks for looking
Jenny x

Friday, 28 June 2013

Fantastic..... It's Friday

YYYYAAAAYYY!! It's Friday, although a wet and windy one. So it's Lydia here with you today at Make The Day Special.

I thought today I would share with you a really bright and cheerful card that I made with my new Avery Elle stamp set 'Framed Fonts'.....


To get the effect with the sentiment- I heat embossed the frame onto the patterned paper then cut an aperture in the middle of it. I then laid this on top of the card where I wanted it to be and then stamped though the aperture with the sentiment. I then added pop-up dots to the back of the patterned paper so it would be raised of the card. I love doing this to add dimension. 

I few pin wheels, gems and pearls later and voila! 

Hope you have enjoyed todays card- and even have a go at this technique. TTFN !!

Love Lydia xxxx  

Thursday, 27 June 2013

Friendship Tag............

Hi there.......

She  here to show you my latest make...........

I have used a couple of Unity kits for my Tag........


My Quote came from 'The Right Words' and my gorgeous Butterfly and Key background are from the 'Key To Joy'  kit........

It's no secret that my favourite colour is Orange!!! Always makes me smile :-).......So I started with that as my base.........my favourite and most used Distress Ink colours were used for my base. I then stamped the Keys with Aged Mahogany. After making sure this was dry I ran it through my bug in one of my embossing folders.

I had half a Tag left from another make (don't ask!! I never throw anything away!!) this was already stamped and coloured so I used my gorgeous Butterfly and then glamour dusted him.....Don't like glitter, so this is great as it gives just a hint of bling!!

I just added some ribbon and Liquid Pearl blobs and squiggles!


Thanks for looking and I'll see you soon......

She xx

Wednesday, 26 June 2013

Admit one


Hello.
I took the more is more approach with today's card lol.
Not my normal more cas style.
As the new lawn fawn stamps and dies have arrived at make the day special i was having a play with an older set Admit one, this set is out of stock but i guess most of you already have it :)
I also used the new matching dies which you can find here.
I love that by having matching dies it rings this set back to life and no more fussy cutting.
I used all the dies and the stamps that go with them.
Coloured with copics and layered them up.
I also used Bannerifiic and matching dies and happy everything for the sentiment.
You can see all our Lawn fawn products here.
Thanks for looking.

Tuesday, 25 June 2013

Bold & Bright Baby Card

Good morning to you all this Tuesday!
Today's project was quite an organic affair. I started out with no plan and finished with this. In real life I'm a 'sketcher'- I have a big red book in which I love to sketch project designs. It often gets me plenty of stares (why is that adult drawing squiggly lines and sketching. Shouldn't she be 'writing'?!!).
Today I simply sat down with this set
It's not supposed to look quite that 'neon'. It's just a bold pink and a peach. I know they're not traditionally baby congrats colours but hopefully teamed with grey ink & washi tape, they err on the side of sophisticated. You'll be glad to know that this set IS IN STOCK- so hurry over, buy them all up just so that the owner has to reorder them (it wouldn't do to allow her to put her feet up now would it!!)
This set is definitely one of my favourites (ever!).
 
See you soon,


Monday, 24 June 2013

Seeing Spots!

Hi!  what started out as a harmless quick but effective little thank you card quickly grew in to a "dotty" obsession this week!  I'm blaming the gorgeous little "Gently Seasoned" stamp set from Paper Smooches!

Here it is...
... looks innocent enough doesn't it??
Well, don't let it fool you!  After one card I was hooked!  Every ink pad I own was out.. looking for colour combos to experiment with on cards, tags, note books etc.. anything that stayed still long enough got stamped!!


Seriously though, this is a lovely little set! I didn't even get past the dots!  Still have to play with the leaves and snowflakes.. this set really is one for all seasons!  And, like all Paper Smooches, the quality of the images is tip-top!
... and check out the next pre-order available here soon!  I'm sure it will be amazing!
 
Thanks for looking!
 

Sunday, 23 June 2013

Watercolours

I've been busy this week helping to organise our school fair that's happening next week so only had time to make a quick card (well, two quick cards) today.

I've dragged out my neglected Marvy pens and used them to ink up the flower stamp from Unity's Moment's In Bloom kit before spritzing with water and stamping on to watercolour paper.

I also used the pens to ink the sentiment stamps from Unity's The Right Words and Life Becoming but stamped these without spritzing.


As always, thanks for visiting

Saturday, 22 June 2013

Now for something a little different

Hello.
On Tuesday i said i would be back with something different and here it is.
A Lawn Fawn bracelet.
These are surprisingly quick and easy to make.
Your also not just limited to a bracelet as they can be made as key chains and more.

This is the finished bracelet.


Here is what you will need to make one.
Patterned paper i have used Lawn Fawn.
Twine, again i have used Lawn Fawn's Lawn trimmimgs.
Buttons
Glue...any will be fine.
A BBQ skewer
Nail top coat/hardener.

To start the beads you will need to cut your patterned paper in to strips these are purely your choice.
I used long thin triangles.
You need to wind around the skewer securing at places with your glue.


Once that is finished and the glue has dried cover the bead with your clear nail varnish and allow to dry thoroughly....this may need a second coat.


You will have lots ready in no time at all :)
Now onto the the string part.


Now the picture above shows how you start.
You will need 2 or 3 long pieces of twine. 
Double one so that it goes around your wrist and then some more.
I have used one extra long piece of twine, you mark the half way point and lay it under the part measured for your wrist. 
Then tie a knot. Any knot will be fine.
Making sure you leave a loop as this will be important for securing the bracelet when worn.
I then took the twine on the right sight and put it over the middle two.
the left side twine then goes over under and over before tightening.
You continue this ( ...it is easier to use two different colours for each side.) only ever taking the same bit of twine over the top.
So the right hand side will become the left hand side after the first time but still take it over the top for the next time.
You will know if you have taken the wrong piece of twine as the bracelet will start to twist and will not be flat.
I hope that all make sense.
Carry on until you want to add your beads.


Adding the beads is really simple.
When you get to where you want the bead to be simply thread each piece of twine through the side its on.
Pull tight to secure and carry on .


It will soon start to look like this.
To finish this i just used a button which goes through the loop created at the start.
I had so many ideas when making these i wanted to stamp lawn fawn images on to shrink plastic to make it a charm bracelet for my daughter.....but where is the shrink plastic when you need it lol.
Please note that this is not waterproof the beads wont like getting wet at all.

I used Lawn Fawns 
Lemon Single Twine
Lemon twine

Pink Lemonade Single Twine
Pink lemonade twine

Pink Lemonade Petite Paper Pack
Pink lemonade and Daphne's closet paper pads.

All Lawn Fawn products used can be found right here.
I hope you enjoyed this (long) post and have a go at making some of these :)
Thanks for looking.


Friday, 21 June 2013

G'day one year old!

Hello! I am being girl Friday today as on Monday my sister and her baby arrived from Australia for their much anticipated,long awaited stay here (happy dance!) Her daughter turned one a few weeks ago,and so I saved her card for when they arrived. Although she is too young to fully appreciate the awesomeness of Lawn Fawn and their very appropriate Critters Down Under set,I thought it was a great opportunity to use it ;-) I kept the colouring bold and simple.

Yes,it is that die again-nearly all of us all have it,so I think you will be seeing it a LOT! 
The paper is Lawn Fawn 'Bright Side',the rest is Lawn Fawn 'Critters Down Under' and the lighthouse is from Paper Smooches 'Smoocheroos' (they live in Byron Bay which has a beautiful landmark lighthouse,so had to include that ;-))
She loved it,and I hope you do too!


Supplies used:


Thursday, 20 June 2013

Milliner Misses!

Hi there!

She here.........

I have a card to show you today using one of my most favourite of stamp sets.....'Milliner Misses'....Did I tell you that I LOVE  ♥♥♥ this set???

I shared this card on my blog earlier this week.......

 All Monochromatic!! Love Black and White too!!


I thought I'd show you a coloured in version..........
I do like to get as much as I can out of my stamps and I'm always surprised how different stamps can looked when used in a slightly different way........

Coloured in with Copics and a different shape!


I hope you like my cards......Thanks for looking and I'll see you soon.......


She xx

Wednesday, 19 June 2013

Dad


Hello.
As fathers day has just passed i have a quick Dad card to share.
This was a fathers day card but could easy be birthday as well.
I used the paper smooches set My Guy ..(which is currently out of stock) for the golf cart.
The background  is made up using punched card.
The dad was made from the lawn fawn Quinn's abc stamps and dies, these are also out of stock at the moment.
I will be back on Saturday with something very different :)
Thanks for looking.

Tuesday, 18 June 2013

Travelling Tuesday!


I love travelling. Haven't been globe trotting much.
I've been to a few choice places including a moment of madness taking 2 small kids to Benidorm. ( shudders at the memory).
However, this little card is perhaps best saved for a more classy journey ;-)
I realise you wouldn't normally put travel and thanks together per se but I'm sure you could find an occasion; a pen-pal's visit ( does anyone have these anymore or was it simply a relic from the 80's?!), or a thankyou to a hostess you stayed with etc.
I've used Big Thanks to create all the thankyou sentiments on the suitcase & the smidgeon of the plane that you can spy is from Mr Boy
.
Now Big Thanks is so popular that it's slipped out of stock- but don't fear- there are other lovely sentiments that would work perfectly for this card like
 
 Just shows that you can really mix up sets that wouldn't normally go together. The little map pieces are from a very old US & Canada road map. Have a go at mixing up two unrelated sets & see what you come up with. Come and post a link to what you create. I'd love to see!
 
See you next Tuesday,


Monday, 17 June 2013

You Are Simply Amazing....


Hello there, Lydia here! Happy Friday....opps I mean Monday! I know my usual day to post on Make the Day Special is a Friday but Lou has some very special vistors over so we have swapped just for this week. Lou I really hope you have a great time catching up :-D !!

Ok for today I have made a simple card where I believe the sentiment makes all the difference.....


The fabulous sentiment is from W Plus 9 and I soooooo can't wait for the pre-orders to turn up. Although this little sentiment isn't in stock at the moment there are plenty available which I need!!! And I think that Label Layers 4 would work just as well.... if not better. 

Ok, that's me for now, hope you have a great Monday !!!!  

Sunday, 16 June 2013

Behind the mask

Today I've been playing with some masking tape and chalk inks to make a couple of Unity cards.

I used the Christy Tomlinson Urban Chevron stamp for the card on the left and the sentiment on the right card is from the Bold Insight store kit.


I've then added stickers and a die-cut to embellish.

Now I'm off to try some more masking and inking.

Enjoy the rest of your weekend and, as always, thanks for visiting!


Saturday, 15 June 2013

Hearts and Crosses

Hello :0).... Jenny here!!

This week has been a busy one but when you 'make' cards you just cannot nip to the shops to buy one even when time is tight and you've left things to the last minute!! I had to put my thinking cap on and make an Anniversary card for my Brother and his Wife... I set out to make a quick card but it sort of evolved into a game.....


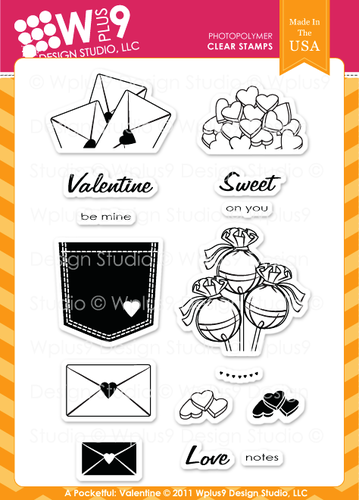
When I first bought the Wplus9 Quilt Cuts 2 dies I could see the potential for a noughts and crosses game board so I went with this idea for an anniversary card and changed the noughts for hearts.
I'd love to provide you with a link to it in store but unfortunately 
I've used an out-of-stock product again ... they'll be back in store soon, even better 
if you grabbed one in the recent pre-order :0)
Image 1

Not satisfied with just stamping I decided to turn it into a 
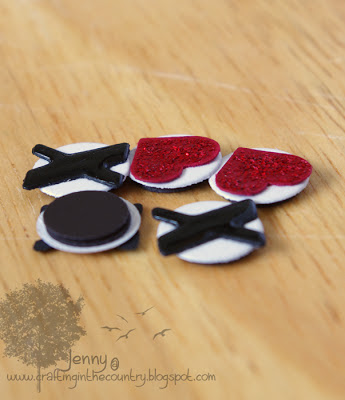
real game with the help of some thin magnetic sheet.
Using a punch I made two small circles for the back of each playing piece and 
adhered a large square behind the grid along with a thin strip lower 
down the panel to store the hearts and crosses on.

A splash of red stickles and a blob of glossy accents to tart up the hearts and crosses along with a simple Paper Smooches sentiment and the job was done :0)


I'm now thinking of all the other possibilities for this grid... 
a simple word game or by adding more you could even make a suduko puzzle????


Thanks for your visit :0)
Jenny x

Friday, 14 June 2013

Yay It's Friday!!!

YYYEEEEAAA HAAAA ! It's Friday, love love love Friday's ! It's take-out night for me (Lydia), and the mini-mes love it as Taidy (Grandad in Welsh) and Grandma Lyn come round for tea. I love Archie's little face when you tell him is Friday, he goes off to nursery a happy lil guy when he knows!

Ok, enough of my love of Friday's .... and onto another love , Paper Smooches...... and the start of a new love affair W Plus 9

(To be fair I could give this card to Friday's , hehehehe.....)


Those adorable little guys come from the Paper Smooches set Woofers and Tweeters - how cute are they ?!?!?!?! I then coloured them up using another love ..Copics! The super cute sentiment is from W Plus 9- this is sadly out of stock at the minute but I'm sure we will have it again soon. 

Well I hope I started your Friday off well- now go enjoy the rest of it :) 

Have a super great FRIDAY!!!

Hugs, Lydia xxx

Thursday, 13 June 2013

Artistic????

Hi there......

She here..........I thought it was about time that I got painty and messy!!!!

I love making Tags!!! And I have lots of cardboard to recycle, so I thought I'd combine the two! I pulled off some of the top layer of cardboard to expose the 'corrugated' bits...I've used paint dabbers in various colours......I use 'dabbers' in the loosest terms....my dabbers don't dab so I just chuck everything onto my craft mat and generally just make a mess!! I've used cut n dry foam, a baby wipe and my finger to apply!

The stamps used are my most favourite set of all .......'Imagine It' by Donna Downey for Unity. I've used paint to stamp directly on the Tag and then Black Versafine ink and clear embossing powder for the sentiment....which is on an off cut of pearlescent cream paper which has been embossed and the paints smudged over....

All that was needed to finish was my favourite punched flowers and Black card candi.......Lots of favourites!!! I had a really good time making this...........

Thanks for looking, I'll see you soon........


She xx

Wednesday, 12 June 2013

With love and hugs


Hello.
I am here with a sympathy card,  never nice to have to make and i still have a heap more to do.
Although difficult to make the With sympathy set from Unity is a go to set. 
The words and image really are just right.
I used a new  3D flip die to make this card and simply inked the centre panels before stamping.

With Sympathy

Thanks for looking.

Monday, 10 June 2013

All Boy!


Hey! How did Tuesday come around so quick? Today's card is a quick and slightly mad boys card.  I've mixed up a couple of stamp sets
This beauty
 
which is an utter bargain- but you'll have to go and check out the price by clicking (making you work today!)
The pocket tag was made by stamping first roughly to give the impression of texture & then coloured over with Copics which added a bit of depth of colour. I then cut it out leaving tabs around the edges of the stamps & folded these back so it's actually a pocket. I've combined it with the stars & sentiment from Mr Boy
 
I hope you're all loving the pre-order facility. The W Plus 9 preorder is here and is shutting very soon-shuts today (Tuesday 11th in fact)  jump in quick. I have my eye on one or two sets.
 
Better go- I don't want to miss the preorder ;-)
 
 
See you next time,