

Hello again :0)
I hope you all enjoyed Colouring week on the blog and managed to find some crafting time on World Card Making Day this weekend.... I certainly enjoyed all the projects and colouring tips from my fellow teamies :0)
Well I'm back today with the last two cards of my Mini Christmas card set and the box to store or gift them in ....

This is my favourite card of the set...so simple and cute!! The little plump penguins fit so well into the sentiment which has been diecut using Finley's ABC's... twice to create a shadow to each letter too. The ice patch is embossed onto vellum and easily adhered by disguising the glue behind the penguins and letters :0)


To decorate the box I've used the penguin design again and just changed up the sentiment.
To make a box I wandered around You Tube and Pinterest to find a good tutorial that I could adapt for the size of my card set and found this style, so this design is certainly not my own but I have made and photographed a net shape to show you. You can make this easily from a piece of A4 cardstock (I've used Crumb Cake by Stampin Up)

2.The green areas in the photo below show which areas need to be cut away and the dotted lines are to be folded and burnished with a bone folder
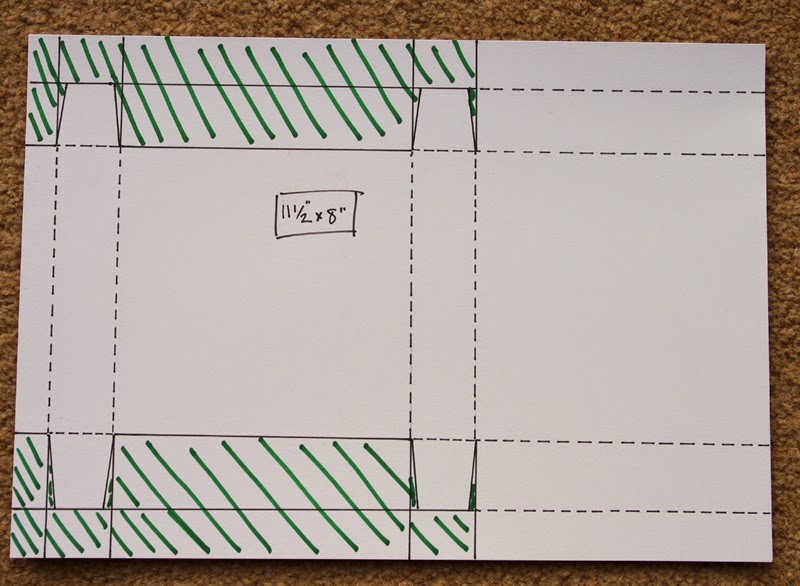
3. Your net shape should look like this after cutting and folding, it's easier to use a circle punch at this point to add a notch as shown in the photo, this helps with opening the box. I've also rounded the two corners of the top and bottom flaps.


I hope that all made sense and you should have a lovely little box that measures 4.5inches square and an inch deep. The cards and their envelopes fit nice and snug in the box... if you didn't see my blog post last week showing the first three cards you can find it here ..this is the set of 5 designs

Well that was another marathon post...well done if you made it to the end.
Don't forget to check out our latest challenge here and also it's Anything Goes week over at Paper Smooches Sparks this week, here's my DT card using Falling for You, Spring Fling and I Heart Art.

It would be great to see you in the gallery for both challenges...you could even be clever and combine them :0)
Jenny x
3 comments:
Cute cards. Thank you for the box template too as it's just perfect for me.
Beautiful cards! They are also so cool! Thanks for the awesome box tutorial!
Cool projects! Thanks for sharing the template!
Post a Comment