Showing posts with label Avery Elle Double Pierced Rectangles. Show all posts

Sunday, 14 June 2015

Let's Hear It For The Boys


 As it's Father's Day in the UK next Sunday we thought it was a good time to show the guys in our lives a little love - so all this week we're bringing you masculine themed projects as we know that sometimes guy cards can be a little tricky for some.

I'm kicking things off today with 2 cards and a little gift - perfect pocket money project if you're looking to get crafty with the kiddies.


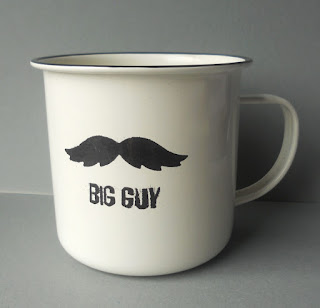
I picked up this enamel mug at a local home store for the grand sum of 49p!  I love enamelware as it reminds me of my Dad's mash can when I was a kid so this was a nice nostalgia trip for me.  Plus enamel is easy to work with but you could use a ceramic one for this technique too.

I die cut a moustache using the great paper smooches die set from some post it tape and wrapped the "waste" around the mug so I could press embossing ink directly from the pad onto the mug.


It's then simply a case of sprinkling on a layer of black embossing powder, tapping off the excess and then carefully removing the post it tape taking care not to disturb the powder before heating it with a heat gun - be careful where you hold the mug - it will get hot!

To add the sentiment underneath I dusted the mug with an embossing buddy before carefully rolling the sentiment onto the mug (a little blue tac holds the mug in place on your desk to stop it moving helps this process).   If you get a little stray powder, use a thin paint brush to brush it away before heating.  The sentiment is from Daddy Yo again by Paper Smooches.


I used the same stamp set to make the Father's day card to go with it.  I stamped the sentiment in black onto green card and then stamped the bottle in embossing ink in a row before adding ultra fine powder and cutting it out.  It's popped up on foam over a kraft base card (kraft always adds a masculine touch I feel) that has some great added detail thanks to the new double pierced rectangle dies from Avery Elle which I used to emboss rather than cut in this instance.  I added a couple of moustaches to match the mug.


Now, not everything we'll do this week will be for Dad's - we don't all have them anymore sadly - but we just wanted to focus on fellas for a week.  So my last project is an idea you can do for any guy for any occasion (well for anyone really).   I thought of word searches when I first saw the new alphabet from Lawn Fawn, so I thought a birthday word search in masculine colours would make a great guy's birthday card.


This is a very simple one layer card - all you need to do is lightly mark out a grid at 1½ cm intervals and then stamp your "sentiment" or in my case lots of words associated with birthdays in your chosen colour and then randomly stamp letters around the words in a second colour.  Once the ink is dry, rub out your grid.

Don't forget to come back every day this week for lots of masculine inspiration - we have a really fun week planned for you.


NEWS FROM THE STORE:

  • Mama Elephant's latest release should be here on Monday fingers crossed.
  • Our new brand, Stamping Bella, will be here this week.
  • We have some limited restocks from Wplus9 shipping on Monday (sorry no giraffes as they have sold out of those too but I will get them back as soon as I see they have them)
  • We have reordered from Lawn Fawn and that should ship in a week or two.


Sunday, 7 June 2015

Make mine 3 Margaritas!

Good morning all.  Wow what a release week we've had.  We had more orders than ever before so didn't quite manage to get all of Friday's orders in the post before the post office closed at noon but we're all caught up now so everything received this weekend will ship first thing in the morning.

With almost 100 new products in store it was really hard to choose one thing to play with today but as my girlfriends and I do LOVE a cocktail I decided to make the fabulous new Margarita die from Avery Elle my focus and with a few add ons have 3 very different cards to share.....

For the first card I used the die as it was intended, as a shaker.  If you find shaker cards tricky then pop out and buy a sheet of foam from the kids department of you local craft store and get some stick-it from us - these two products together make shaker cards SUPER easy!!!


For this card I used the colour of my sequins as my inspiration - these are the new mermaids tail ones from Neat and Tangled.   Here's a quick step by step guide to making the shaker.
  • Die cut the margarita glass including the "inner bit" from a sheet of white foam covered with stick-it on the back twice and once with stick-it on BOTH sides of the foam.
  • Die cut it once more including the "inner bit" from a sheet of white card.
  • Colour the card (if you want or leave it plain).  I used copics in blue and purple to shade the glass using the blender pen to make a seamless transfer between the two in the middle.  
  • Die cut the glass WITHOUT the inner bit from a sheet of acetate.   
  • Stamp your sentiment from the co-ordinating set Happy Hour on your base card using the card version of your die cut to make sure you have it where you want it.
  • Layer up your foam die cuts ensuring that the one with stick-it on both sides is on top.  Leave the release paper on the top.  Stick your stacked dies onto your base card.
  • Add your sequins and then remove the release tape from the stick-it.
  • Stick your acetate on top to hold the sequins in.
  • Stick your card die cut over the acetate and give it a shake!
You can see from this side shot how much dimension the foam gives you - so much easier than messing around with bits of foam tape on your card stock.  You could just use one layer if you wanted to mail this but you'd not get many sequins in.


To finish the card I added one of the gorgeous new frame die cuts (I should have cut these from foam too but forgot so you can see I had to mess around with foam tape lol!)  This is the double-pierced rectangle from Avery Elle.   I simply coloured it in one of the same blues as I used on the glass.

OK, so Margarita number 2.......

If you don't want to make shaker cards, then this die is still perfect to use on its own as an element for folks who like a drink - my girlfriends will be seeing this die a lot!    Here I've paired it with the great new sentiment "main squeeze" stamp from WPlus9 which is a great match!


You could die cut the glass from card stock but I thought I'd use vellum so I could place it over the large sentiment.  I cut the lemon from vellum too and used copics to colour it - I love how you get the segments to layer on top!  I added some stickles to the top of the glass to look like a salted rim.   I added colour using distress inks and the "smushing" technique and then a few splatters with a paintbrush.  

This die is such a good size that you could also use it to make mini cards or gift tags.   Same with the complimentary wine glass die.

Margarita number 3.........


No, I've not lost the plot from late night parcel packing!  When I die cut the shaker, I popped the "inner bits" on my desk upside down and they instantly looked like a classic flying saucer so I knew I had to do something with them.   My husband is a sci-fi fan so when I showed him the space ship he said it needs to abduct a cow (no I don't get how his brain works either!!!) and hence I created this crazy little card. 

The foam was coloured with copics and I used some vellum and stickles for the "abduction beam"  I used a black base card and added a grassy die cut and some stars for the background.  The cow is from Critters on the Farm and I used a little artistic licence to draw on a surprised expression and a tongue....

Catch you next week
Tara


NEWS FROM THE STORE:

  • Altenew restocks plus the new mini ink pads will be here Monday or Tuesday.
  • Stamping Bella will be here this week (fingers crossed)
  • Lil' Inker Designs latest release will be here this week too.