Showing posts with label CAS cards. Show all posts

Tuesday, 15 September 2015

Handy Stamps


Hi!
Have a couple of projects to share today..with a stamp set that came in very handy!
I do love a good challenge, and someone had wondered what I'd come up with using this set..so I thought I'd oblige ;-)
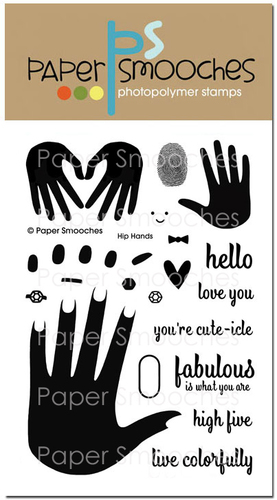
You've heard the saying 'don't judge a book by its cover'? Well this is similar ...look really really carefully. First up- an absolutely fantastic fingerprint stamp..


You can also add some teeny weeny faces to create a really fun set of his'n'hers prints just perfect for a wedding or love type card.
 Next up...the hands. Looking carefully you'll notice I've actually stamped the hands upside down.. they're formed together making a heart shape with the negative shape, but if you flip them over, they look like they're waving and so fit like a glove (ahem..) with one of the sentiments!
 Then, flipped the correct way, adding in some hearts also in the set, you have an elegant CAS cards perfect for more 'love' occasions.
 Now, there's a large hand.
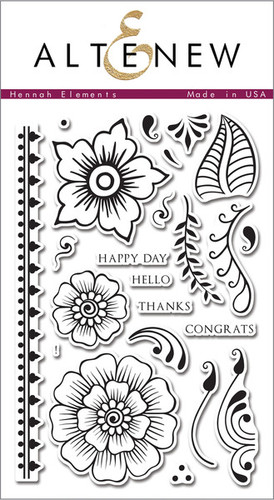
Had I some flesh coloured ink, I desperately wanted to do a henna-styled hand, using some graphic flowers like the Altenew set Hennah Elements
Well I have to 'hand' it to Paper Smooches, this is a deceptively versatile set, and one that I'll be laying my hands on regularly (alright, enough of the puns!)

Do give some of the stamp sets in store a second glance...there are some real treasures to be dug up!

See you next week


Tuesday, 24 March 2015

Pac-Man Pie!


Hi! Hope you're all ok today? Today I've gone back to the 80's.
80's gaming in fact. That time when Pac-Man was totally cool and I remember trying to master the game before the monsters got me.
This card came about as I was looking at this set Humble Pie from Avery Elle
                                       
See the pie/PacMan? 
I needed some fruit and so immediately thought of the Milk and Cookies set from WPlus9
                                         
Simple, a little cool and perfect for that bloke or even a teen into gaming.
It made me smile making it...altho you don't want to see my first attempt! ;-0
                  
See you next week..

Keren x

Tuesday, 3 March 2015

Distressed Flowers!


Hi there! 
I'm ushering in spring (not that outside is any different temperature-wise!) with a bevy of blooms courtesy of Lawn Fawn 


Really simple to create- just two colours of distress inks per flower and then sprayed with water to add a lighter colour and texture.
I've then cut out around the stacked blooms to give a different edge and accentuate the flowers.
I've added navy stripes and some Glossy Accents on top of the strips and flowers 
It's a little over the top- but hey, you can't have too many flowers can you?!
It you're looking for another way of using this set- why not watercolour them rather than use distress inks? 

See you next week

Tuesday, 7 October 2014

Anyone for a Holiday?!

 
Hi! Have you noticed all the holiday adverts on TV? The promise of a perfect holiday with perfect weather in a perfect place with a perfect family?! Do you have those kind of holidays? Me neither?!
 
I was thinking about getting out and about and this Happy Trails set by Lawn Fawn came to mind
http://www.makethedayspecial.co.uk/shop.php#!/Happy-Trails/p/33080911/category=2717757
I've tried to make it look like it's slightly snowy by adding white trees behind the green. It's stamped onto acetate in black first. I've then stamped it onto white cardstock, coloured it in and then adhered it directly behind the acetate layer so it looks coloured.. an easy technique when you can't colour in a surface.


You can see in the first picture that there are little puffs of exhaust fumes actually coming off the card. I'm afraid the photo has a little of me reflected in it, but taking pictures of shiny surfaces is sooo hard. Tips anybody?
 
I'll leave you thinking about holidays and crisp white mornings in snowy climes. Where's the travel brochure..quick!!
 
 
Keren xx


Tuesday, 19 August 2014

A different sort of relaxing!

Last week we were breathing deeply with a substantially serene card. Today? not so much! I've made a 'tongue-in-cheek' relax card and it's one that tons of you will relate to! The sort of card you'd send wishing someone a 'great holiday' or 'big adventure'.
It's that wonderful driving to your holiday feeling where you're bumper to bumper with the car in front. It's using this fun Lawn Fawn set 'Happy Trails'


Now, I'm not a massive camping fan (don't get me started on our camping disasters!) but this set is way more adaptable & I hope this card shows. I've also used Cole's ABC's but that's not in store right now, so I'd plump for Louie's ABC's instead. Once I'd die-cut the phrase, it was looking a little lost against the grass, so I outlined them with green and added a hefty dose of Stickles!
For any of you setting off soon, don't forget the really annoying kids CD's to be played full blast for the 'delight' of everyone else in the car. 


See you soon,
Happy queuing! 

Enjoy the break…and….relax

Tuesday, 12 August 2014

And…Relax!

Morning! Can't you tell it's the summer holidays!
There needs to be a whole ton of relaxing done.. except I'm not feeling it quite so much!
A card like this would be very welcome right now!
This is probably the simplest card ever.. but just goes to show that sometimes 'less' is most definitely ok!


I've used these lovely products- and for those that thought the font on Louie's ABCs dies might not be too large and only suitable for scrapbooking (ahem.. that would have been me ;-) ).. it's NOT. 
It's perfect.
It also subscribes to the 'the bigger the product the more quickly finished the card' school of thought. A CAS quickie at only about 7 minutes in total!
The simple shadow is enough to give a little contrast and the tiny details are courtesy of the Hello Sunshine stamp set
Do try 'minimal'.. it's a wonderful feeling!
Oh.. and don't forget to breathe.. and relax today!

See you next week,

Keren xx

Tuesday, 15 July 2014

Really, Superbly, Greatly, Perfectly Happy!

Good morning! Are you happy?!
Hopefully this card will bring you a bit of rainbow brightness and leave you with no doubt that the sender is wanting to wish you a ton of 'happy'!!
Now the 'Happy' set has just slipped out of stock but there are these alternatives- perfect for recreating the stacked die cut look-
or even these

It's a super-easy technique- just die-cut to your heart's content in a plethora of rainbow colours and simply stack, shifting each word slightly to the right (or left!) until you have a big chunky statement piece that leaves little extra embellishment needed.

For the balloon stack I simply layered up a few of these from the Whole Lotta Happy dies
Well, that's enough 'happy' for one day (yeah, right!)- I hope you pick up a couple of word dies from the shop, dust off your die-cutting machine & get stacking!

See you next week-
Keren xx

Tuesday, 3 June 2014

Flying High!


Happy Tuesday everyone! It looks like the perfect day for a flight. I've gone all Mary Poppins on you..remember the 'Let's Go Fly A Kite' song where all the kites take off into the air? I thought the little creatures could do with some freedom too. Ok, there's no kite, but the balloons from Hello Sunshine make a good substitute!
I've also added in the little deer from Into The Woods.. he was the perfect 'weight' at the bottom to make sure they didn't fly too high! I did cut the sentiment into 4 pieces because masking it was going to be too tricky so I've now got extra mileage from my set!

Both sets are in stock & just waiting to be set free! Hope you get time to fly a kite today too ;-)

See you next week,


Tuesday, 27 May 2014

Something Wonderful!

Hello! How are you all? Thought I'd squeeze another project out of what is probably my favourite stamp set at the moment..'Wanderlust' by Mama Elephant.
The tiny map stamp is gorgeous for a background image & I've simply punched out lots of little holes where the circles are on the stamped image & backed them with coloured cardstock giving a rainbow coloured effect. I'm on a bit of a rainbow kick right now so the black and white main part of the card is the perfect base for colour.
I die-cut circles out of the panel & added a few extra bits- such as the sentiment & an angled matt. Another big go-to supply right now is acetate, so I used that for the card base to make more of an unusual card. 

Hope your day has something wonderful in it ( mine will involve baking, crafting & a kids party !)

See you next Tuesday,

Tuesday, 1 April 2014

Blooming Lovely

Happy Tuesday..and Happy April too!
 It's totally blooming where I live. Awash with bursts of blossom & vivid colour. I just love this time of year. I wanted to get this flower filled set inky & do something a little different with it. Instead of just inking & adding the banner, I wanted it to be all inclusive (but good, not like those nasty all inclusive cheap holidays!!). In order to do that, I had to do quite a bit of masking, plenty of careful trimming & lots of different hues of leaves. I love the brightness & the clarity of the colours (thanks to the fab quality of these stamps).
The set is Penelope's Blossoms
and you can see the ton of potential in the set. This card was perfect for Mother's Day but could double for a Birthday too.
I had made a mistake when stamping (you can see it on my blog) but due to a cover up, you can't see it. Can you guess where it was?!!

I'm off to smell the flowers (with the hope I don't start with the hayfever!!)

See you next week,

Tuesday, 4 March 2014

Birthday Scrum!

Hey!
Happy Tuesday! It's Pancake Day- there'll be lots of pancakes consumed today- and if you eat too many you may end up looking like one of these hippos. However, they all look incredibly happy so maybe these hippos are on to something good!
If you were lucky enough to get this set

then you can make this 'pancake stack' of hippos- otherwise, there's still loads of Lawn Fawn loveliness here- you just need to be quick- the stock is FLYING!

A little technique tip for you- if you're wanting to make this kind of look- post-it notes are your friend. You'll need to stamp the image onto one of them, trim it out really carefully & to create this card, I started at the top, stamped one hippo, then covered it with the hippo post-it 'mask' then stamped below. I kept moving the mask onto the just stamped image and made my way down the card.
You probably can't see very well, but the hippos are actually slightly 3D- 
To do this, I discovered a neat trick a while back whilst waiting for the Glossy Accents to dry. As you're putting a liquid onto cardstock, it does soak in and make the card slightly pliable. I simply rub on the back of my images- you can see where the Glossy Accents is starting to soak in, By gently rubbing in a circular fashion, you can 'push' the image out slightly from behind & give you card an even more dimensional look!

Better go- flipping to do!
See you next week


Friday, 31 January 2014

All about Avery

Hello!
Its Lou here with a quick (well,it was a trifle fiddly) CAS card.
When I saw these Avery Elle dies,so many ideas popped into my head-this was my first one. I wanted to make a tiny bunch of roses wrapped in 'newspaper' (a piece of book page) and tied with twine. I used tweezers to grip and roll these micro blooms and get them into the cute shape I wanted,gluing them into place as I went and finally tying a piece of twine around the cone. And yes,I couldn't resist inking them a bit ;-)


A close up...

There are SO many different uses for the Embellish It Flower die-it is awesome!
The stripes are from Avery Elle Knotty and the sentiment is from Avery Elle Oh Happy Day (OOS at the moment,but will be back in very soon). It's a veritable Avery Elle-a-thon! 

Lou

Monday, 6 January 2014

A-corny Card!


Happy Monday- it's one of those days where Christmas feels really over and everyone has a tendency to the doldrums.
So- I'm doing bright, happy & somewhat corny or 'a-corny' -if you get my drift.

I've used a Lawn Fawn alphabet set and the ever lovely 'Into The Woods'. I simply traced around a die cut circle with pencil, positioned the acorns in a regularly spaced position, then coloured and glittered the little heads. I drew out a banner shape & positioned the sentiment over the banner.

I know it's a dreadful pun. Forgive me. I'm still a bit sluggish after all those Christmas chocs.
Jenny & I have swapped days, so she'll be posting something amazing as usual, tomorrow.

The shop is so very nearly open… hang on for just a leeetle bit longer!

See you soon (hopefully with a less corny sentiment!)


Keren x

Tuesday, 8 October 2013

Hanging Leaves !


Hey! How are you all? I'm popping by with another card using the set from last week.
I'm quite smitten by all those leaves & rather than imitate movement, I thought I'd suspend them on thread & hang them from a thin rectangle of card.
By simply adding two layers of 3D foam pads- there's enough clearance for them to 'float' and give the impression of falling.
I've used this Unity set 'Harvest of Memories'
 
 
It's a wonderful set- if you don't go and clear and the store out of this gorgeous set- I'll do a Christmas themed card next time!
 
Happy creating!
 
Keren xx