Showing posts with label Paper Smooces Dots and Dashes Die. Show all posts

Monday, 18 May 2015

Two of your Five a Day!!


Hello there :0)... yes I've turned my attention to Fruit and Veg for my Monday morning blog post and it just so happens that today also marks the start of National Vegetarian Week too!!. I could pretend I planned it that way but that would be fibbing!!

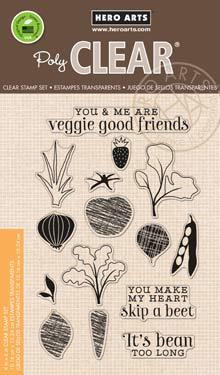
I fell in love with the sketchy images in the Hero Arts 'Stamp Your Own Salad' set, they have a bold graphic feel and I could see textiles and patterns popping out at me so I suppose it's a bit odd that I should be trying watercolouring with these images. They help you cheat a little at watercolouring but the recipients of your projects will think you've spent ages on them :)


Because the images have a crosshatch scribbled look to them it means they lay down a nice amount of ink when you use distress ink pads so all you need is a damp waterbrush to fill in the base colour. I found second generation stamping best because its best to start with a pale colour!! Once the base colour is dry you can then build up extra layers and shades to add shape and texture to your images. It's all about taking some scrap watercolour card and having a play with ink and water :)


With the tomatoes above, I completed one fruit first and then blasted it with a heatgun to dry it off before stamping the second image behind it. You don't really need to make masks because you can roughly judge where to wipe the ink away from your image before you stamp it.... any overlap or gaps can easily be rectified when you add water. I got brave and tried inking half the tomato to make a wedge shape.... by wiping some of the ink away in the centre and using second generation stamping I managed to get a paler impression to work with. I Googled an image to make sure I replicated the inner colours and shapes right. I had a few practices first on scrap card :)


The carrots are created pretty much the same, one at a time and allowing them to dry in between layers. The tops aren't quite right for carrots (think they're supposed to be parsnips actually) but that's okay unless you show your husband who's a keen gardener!!
I stamped the tops in a pale green and used darker ink to colour them. The colour bled a little with these so I decided to go with it and work on that look but it's quite hard to make an accidental colour bleed look accidental!!

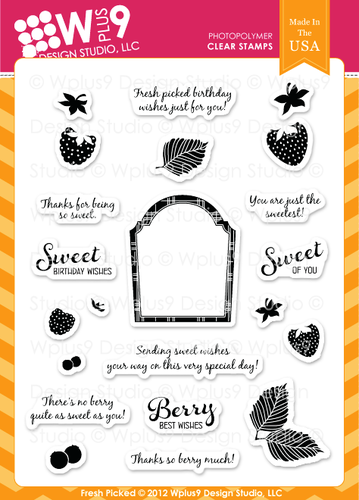
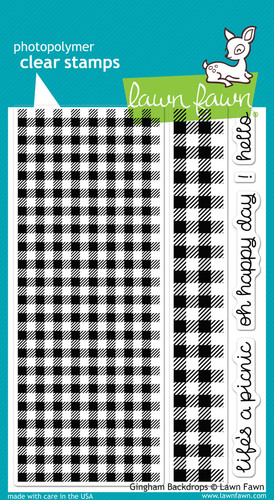
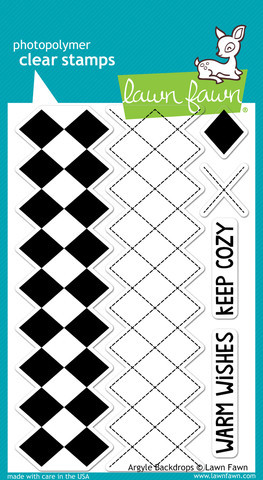
To finish them off I kept the base card simple and used Lawn Fawns Argyle and Gingham backdrops to add a subtle pattern. The sentiments are from Wplus9's Hand Lettered Thanks and Fresh Picked.

         Stamp Your Own Salad  Hand Lettered Thanks  Fresh Picked  Gingham Backdrops 
                       Argyle Backdrops  Quote Tag Dies  Dots and Dashes Dies

Thanks for stopping by :)
Jenny x

Saturday, 15 November 2014

Joy To The World – Use Your Alpha Dies Creatively

Today's card shows you how you can use your alpha dies – almost all alphabet dies will work here – to create a christmas themed card. I am using the Mama Elephant Inline Alphabet dies because they are so narrow that I can fit my entire "sentiment" onto the card. I picked "Joy to the world" because that somehow conjures up happy thoughts of christmas movies, mulled wine, a crackling fire … ahhhh, I so want it to be cold and christmas-sy.


I lined up the dies for each word against the straight edge of acrylic block to make sure my words weren't crooked, then used the sticky side of a post it to grab them and temporarily stick them to my card. Of course, I needed to do that multiple times because I needed a few letter more than once :) It's not terribly difficult, you just need a bit of patience. And since crafting is supposed to be enjoyable, this is best done with a glas of wine or cup of milk, whatever keeps your mojo going. (As you can clearly see, I had maybe two glasses of wine which I blame for the words being a tiny bit wonky)

I cut the front panel, from which I die cut the words, a bit smaller than the standard A2 card base and then used a Paper Smooches die to create the perforated border. A bit of red card stock beneath it and now we're already getting into the holiday mood. Use any kind of glitter or glitter pen to give the red that peeks through the letters some shine and sparkle.

You could absolutely stop here and leave the card as is, but I had to embellish it just a bit to make it sparkle and shine even more. If you'd prefer it to be plainer or more CAS, leave out that step.

 Thanks for stopping by – have a wonderful weekend!

Sunday, 13 July 2014

Die-ing to Sew.......

I'm always envious of crafters who sew on their card and scrapbook projects - I love the machine-sewn look but I can't do it myself.  I have a machine - but I am terrified of it!   So for today's project I went old school and dug out a big darning needle, a new die cut which screamed "sew me" and some gorgeous multi-coloured twine and this is the result:


I started with a piece of 300gsm white card - you really do want it thick so you don't tear the holes whilst sewing and I cut a panel to fit my card and then sliced it into two.  I then used the supremely useful new Dots and Dashes Die set from Paper Smooches to cut rows of holes down the sides of the panels ready for sewing.

I loaded my "big" needle with Lawn Fawn's Pink Lemonade Twine (you'll find large eyed darning needles in your local haberdashery store) and then simply laced the panels together leaving a gap (you have to keep pulling it apart to keep the gap consistent) to show off the twine and the ladder stitch pattern.

To add a sentiment I decided to go with a bold die cut and used the Simply Said Hello Die from Avery Elle and die cut it twice - once in hot pink and once in black, using the black to create of offset outline to make it stand out from the background more.  As this fits the current AEIHeartU challenge of "one word" over at Avery Elle, I'm linking it up there http://aeiheartuchallenge.blogspot.co.uk/2014/07/aeiu-challenge-11one-word.html

I finished with a few gold sequins from the Neat and Tangled's Pixie Dust Sequin Mix.  The sequins have been really popular so all the sold out ones have been re-ordered, along with a new mix which has yet to be released but it  perfect for summer!   They'll be here in a couple of weeks along with the new stamps that are getting sneaky peeks this week on their blog.

We have the new Avery Elle release (and restocks including Red and Goldie and Storybook that we've been waiting a while for) coming to store this week (it's currently in customs clearance) and we have restocks of Mama Elephant following with their as yet to be revealed July release.  Lil Inker's have a new release and that is on it's way along with some restocks - lots of the items we are out of they are sold out of too, but they are getting restocks on 25th July and my order is already in so we should have everything back early August.  We also have a BIG new brand coming - and it's one you've all been asking for so I know you're going to be VERY happy ;-)   That's all I'm saying for now but all will be revealed in a few weeks when the first delivery arrives - suffice to say I am VERY excited!!!!