Showing posts with label Mama Elephant Basic Set Creative Cuts. Show all posts

Saturday, 21 November 2015

Create Depth and Dimension with Copic Coloring

Are you sick of Christmas cards yet? I sure hope not, but I thought that it would be fun to do something non-Christmas related today. It's the season of snow and cold and mulled wine, but also the season of running noses and sore throats. To be prepared for the inevitable cold, which this year will hopefully not strike me down at Christmas, I decided to prepare a few "get well" cards, just to have them handy.


There are a few aspects to this card that I would like to point out, specifically because I have struggled in the past a bit to make sure that my cards have a strong focus point but not a lot of distraction. I either ended up with cards that were too white with a focal point that was not interesting enough, or too much clutter on my card.

First and foremost, I tried to create interest for my focal point (the boot with the flowers) with my Copic markers. You know that I like high contrast coloring, which means I have deep shadows and light highlights. I tried to do this on this board here and I also added a few black dots, simply to give the boot more character.

I could have just mounted it on the white card base, but I decided to use some sponge daubers to create a blended background. I kept with a fall color scheme that would complement of the colors of the boot and flowers. I had the images fussy cut with my Scan ’n Cut machine and the slim white border helps for additional contrast against the background.

By having such a strong colored image and the colorful background, it's much easier and pleasing to the eye to leave the rest of the card white. You have one area on the card that draws in your attention. I even accentuated it by adhering some half pearls to the scallops on the diecut circle.


I had originally intended to add another butterfly on the front panel of the card, outside of the circle, but when I had placed it on my card I saw immediately that it wouldn't work. To have a contained area of color helps to draw the attention and to make that area pop even more against the rest of the card which is stark white.

I hope you have enjoyed this project and have a fantastic weekend!

Saturday, 14 November 2015

Elegant Christmas Card for Easy Mass Production

Howdy, crafters! Are you getting a slight panic attack when you hear the christmas jingles playing in the stores? I do, not because my cards, but because of presents. No clue what to give my family … we never give expensive stuff or electronics, but I am trying to figure out what book my dad might enjoy and which massage treatment my mom didn't have yet :)

Apart from that, I'm getting into the christmas spirit and today I have an easy card for you which you could easily mass produce! Yes, I said the magic phrase: mass produce! Let's take a look, shall we?


I started out by die cutting a piece of sturdy white card stock so it would have a stitched frame. You can totally skip this, but I like the little extra that gives my cards. Then I die cut one of the stag from the Wplus9 die set directly from this card front – you can save that piece for other projects.

Thanks to the glitter by Elizabeth Craft Designs I can make my own glitter paper in any color I like. I covered the same type of paper that I had used for my front panel with a piece of double sided adhesive, poured glitter onto it, and voila - glitter paper! Once you rub the glitter, it doesn't come off, so you can die cut through it without any problems. It's important to use the same paper for this as for your front panel because we are doing inlay die-cutting and you need the same thickness of paper.


You could of course just mount the deer on top of the panel, but have you ever seen people get a card that they know is handmade and then try to figure out "how you did that"? It's hilarious, and inlay-die cutting is something that looks awesome, and will certainly be admired by the recipient (yes, I am vain like that).

The sentiment was stamped with brown pigment ink and I used my Letterpress as a stamp positioner again. Sometimes, I don't get a good first impression with my pigment inks and I don't want to line up a complex sentiment stamp like this by hand. As you can see here, my first attempt wasn't perfect, but thanks to the Letterpress I was able to stamp in the exact same position again. Awesome!


To add some color to the card, I added a ribbon (not my best bow, sorry) and some sequins and gems. I wanted to keep this card simple and elegant, and I love the unusual color combo for the season.

I hope you enjoyed this tutorial! Thanks for stopping by today!

Saturday, 24 October 2015

Partial Die Cutting (With Dies or Fussy Cutting)

Halloween is coming, crafters! Even though it's not celebrated as widely in Germany as maybe in the US, I couldn't help but make yet another fun halloween card using the MFT "Witch Way is the Candy" stamp and die set. Today's focus is on coloring with Polychromos colored pencils and on partial die cutting.


I have to admit, I am terribly proud of this card – it turned out just perfectly and hopefully will delight my crafty friend in Canada in time (mail seems to take forever over there!) The partial die-cutting was really quite difficult this time around – I actually spend a few minutes before I recorded the video practicing it because I had no feeling at all about how I would go about it. Also, the new Sizzix cutting plates have this softer edge which makes it more difficult to cut precisely.


If you do not (yet) have the matching dies for with witch, you can also fussy cut her! What you need is a circle die or the new Stitched Arch dies by MFT to do get the circular shape, but from there you can use your scissors and cut around the witch. Just in case your budget doesn't allow for the matching witch dies or they are OOS (as they are right now, sorry!).


As for the coloring, I once more used my preferred water color paper Torchon by Hahnemühle. It's bright white and has some tooth (texture) which makes it easy for the pigment of the pencils to hold on to it. The coloring technique I used it the blending with pencils, without any extra solution.


Adding my signature dots at the end was more of  a spontaneous decision than planned genius :) I thought that the huge orange background could do with something to spruce it up, but for the longest time didn't know what. Admittedly, I was surprised about just how much of an effect the white and few silver dots had. They really pop against the background and enhance the entire design.

I hope you enjoyed the project and have a spooky and fun Halloween! Thanks for taking the time to stop by today and leaving a comment, I really appreciate it!


Saturday, 3 October 2015

Combine Different Stamp Sets: Ella and Leaves

Are you enjoying the fall? Me, totally! I love autumn: the light, the leaves, the colors – except for the darker mornings, which make it hard to get out of bed. But to help you get started with your day today, I have a fun card for you.


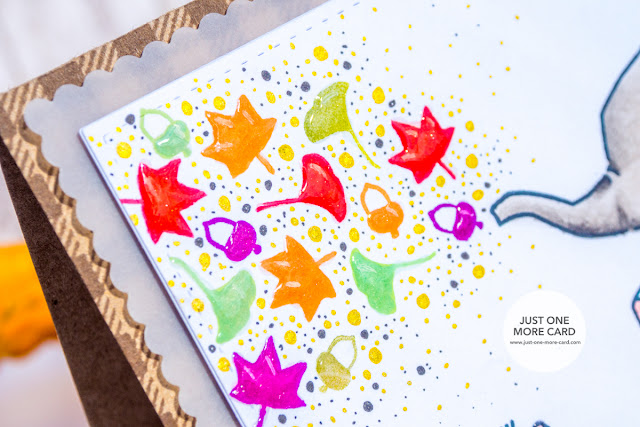
I combined a Mama Elephant and Hero Arts stamp set – I just thought it would be incredibly cute to have the elephant blow leaves through the air for his little friends. As usual, my color choices were inspired by Pinterest. It's so much easier to find a good combo there than to go through dozens of trial and error runs by myself.


Since the leaves looked a little lost on the card, I grabbed my golden gel pen from Signo and added some dots throughout; I even added a few black dots because I felt that this part of the card lacked contrast. I then added some gold dots on the elephant, just for the fun of it.


Also, I added the sentiment to the inside of the card. I find that it's a neat surprise to see it there when you open the card, and also it gives me more space to work with on the outside of the card.


Thanks for stopping by today,  I hope you enjoyed the project!

Saturday, 15 August 2015

A Gnomey Birthday

Hi crafters, Julia here for you today with a fun and cute birthday card featuring the sweet stamp set "You Gnome Me" by My Favorite Things.

I had to create a card for my dad who turned 82 a week ago, and as my eyes wandered across my extensive stamp collection I gasped when I saw the gnomes. Because: despite his age, my dad is super active (still teaching phys ed) and he loves to work in his garden. So, the gardening gnome it was!


I also wanted to give my colored pencils a workout and decided to color my entire scene with Prismacolor Pencils. For that, you should use a paper which has a little bit of tooth so the pencil can hold on to it better and it also allows you to work in many layers, which is the trick to really great blending with colored pencils. If you want to see how I colored him in detail, hop on over to my blog (see sidebar) and check out my video!


For the scene itself I also used the Grassy Border die by Lawn Fawn and the Landscape Trio from Mama Elephant. I used some Distress Ink behind the clouds to make the skies blue, and some Distress Ink on the grass so it wouldn't be one flat color but have some more interest because of the shading.

You'll notice that the grass and clouds also have a stitched border all around. That's because I die cut the vellum and green card stock first with a Mama Elephant basic die and only then finished the shapes off with the other dies.

Sorry for the German sentiment, but my dad never learned English, so I had to with something German :)

Thanks for stopping by today! I hope you're having a fantastic weekend!