Showing posts with label Elizabeth Craft Design Glitter. Show all posts

Saturday, 25 July 2015

You Are Wonderful

Sometimes you just gotta be bold! What holds true in life also holds true for your card making. I bet most of you have bold sentiment stamp sets at home and you might struggle on how to use them best. Well, today I am using the Kudos set by Paper Smooches and I will show you how you can easily create a simple and elegant card with it.


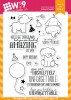
The stamps in this set are all very large and bold, at least compared to most other stamp sets. They would be perfect to match with any image stamps like critters or even people. But I also know that not all of us have the moneyz for many stamp sets, so I tried to stick with just _one_ set today (gosh, that really took quite a bit of discipline!). I started by drawing a diagonal line with my pencil across the front of my card and then grabbed a grey pigment ink from Mama Elephant and stamped the "you are" as a pattern across the upper part of the card. I also sprinkled in some butterflies (from the same stamp set) with orange ink for a colorful accent.

I gave that pigment ink a quick spray over with hair spray (that helps me to set it so it won't smudge later) and zapped it with my heat gun to dry it. Then I put down a strip of slim double sided adhesive tape (you can also cut a strip of double sided adhesive sheet) exactly where I had drawn my pencil line and poured Microfine Glitter on top. You need to rub the glitter gently into the adhesive and it will not only stay where it's supposed to stay but become really shiny.


I cut down a piece of vellum to cover the upper part of the card and then stamped my "wonderful" with Versafine ink. You have to be careful about which ink you use on which type of vellum. A lot of inks start to feather/bleed on vellum. To prevent that, I immediately dumped some embossing powder over the wet ink and heat set it so it would remain crisp.

I could have glued the vellum to the card base and it would have looked neat, but instead I opted to make two holes and thread twine through them and keep the vellum attached this way.

I hope you like this unusual take on bold sentiments. Thanks for stopping by and commenting, you make me super happy with your feedback!

Saturday, 27 June 2015

Unforgettable Coloring and a Glittery Hello

Hi crafters, Julia here! I know that a lot of you have the "Unforgettable" set by Wplus9 and and since it's back in stock at the Store, I wanted to play with it.


I started out by stamping the little elephant onto some white card stock. Then I grabbed my Prismacolor pencils and started to create my background. You can do this with any medium you like: Copic markers, watercolor, you name it. Whatever feels good to you, go for it!


For the front panel, I die cut it with the Wplus9 Sunshine Layers dies and then also die cut a circle through which my elephant would peak. Any shape would work, but I am currently stuck on my circle shapes so you will probably see more of them in the future. Sorry ;)

I also used the Hello die by Wplus9 for the sentiment and die cut it into the top layer of my front panel. The front panel is actually two layers of white card stock. They are adhered together by using a sticky sheet and before I adhered them together, I poured some Micro Fine Glitter onto the sticky sheet so it would shimmer through the word that I die cut from the top layer.


Then it was just a matter of mounting the front panel onto the card base with some foam tape. I finished up the card by adding some enamel dots and some rhinestones for sparkle.

I hope you enjoyed the card. Thanks for stopping by and leaving a comment, you brighten my day!

Saturday, 11 April 2015

High Contrast Card with Glitter and Flower Dies

Hi crafters, Julia here!

I wanted to give my flower dies a nice workout, and I also wanted to create a high contrast card. I usually shy away from dark colors, but I think they work beautifully with vibrant colored card stock and the glitter.


For some additional highlights, I used double sided adhesive tape and some Stick It sheets (if you don't have double sided adhesive tape, you can just cut a strip from the Stick It sheet).

I first put down the strip across the card and poured some Elizabeth Craft Microfine Glitter in Antique Silver on it. You need to gently rub the glitter into the adhesive to make it stay there permanently and guess what – you can use one of your ten always-present-tools for that: your finger ;)

For the sentiment – that took a while to figure out. I won't bore you with a description of my failures. Suffice to say: the good reviews for the Stick It sheets didn't exaggerate in the slightest. I was absolutely unable to die cut my other adhesive sheets with my word die so I could just put the adhesive on the card. It just didn't cut, even with a shim. The Stick It sheet worked like magic. I peeled off one side, stuck it onto the card, rubbed it to make it stay, and then peeled off the other side. Once more my glitter came out and – voilĂ !


I hope you enjoyed the card and have a great weekend! Cheers!

Saturday, 4 April 2015

Sparkle Up Your Cards With Microfine Glitter

I guess we'd have to live under a rock not to see the amazing crafty projects that Jennifer McGuire creates every week. And since I'm in love with glitter, my eyes almost popped right out of my head when I saw her use glitter on a die cut recently. But did you know that our very own Make The Day Special Stamp Store carries these fantastic glitters? I was delighted to finally find a place here in Europe where I could indulge in all their sparkly fantastic-ness and I'm showing you a card using that glitter today:


I put some double sided tape (also available as sheets in the store) on some white card stock and then ran it with the sentiment die through my die cutting machine. When I removed the backing paper afterwards, I exposed the sticky underneath and could pour my glitter on the die cut. I made sure the colors overlapped so it would be easier to create a nice blend.


The sentiment on the front is a combination of the Lil Inker "Seriously" die and selective stamping with the Paper Smooches "Uplifters" stamp set. I purposefully used kraft paper, since it sets off the glitter nicely.

Hope you enjoyed the card and get sparkly yourself! Have a great easter weekend!

Saturday, 14 February 2015

Make Your Tiny Stamps Shine with Mama Elephant and ECD Glitter

Hello fellow crafters, today I have a card and a technique for you which I hope will excite you as much as it excites me. My main focus is on coloring with a medium you might not have considered so far: Stabilo fibre tip pens. And before you groan at yet another thing to invest in, I'll stop you right here: they are super cheap (your kids might use them already for school or just plain coloring), you can buy them in packs or individually, and if you have water color paper, chances are you can achieve blending effects similar to Copic markers!


The star of today's show is the little fellow from the Mama Elephant Cosmic Stars stamp set. You can color him any way you want, but I used the Stabilo Pens I mentioned. I found that, on water color paper, they blend very nicely. Now, don't get me wrong: you won't get the same quality of blending as with Copics and these cheaper pens are better suites for smaller images, but if you are on a budget, the Stabilo Pens might be worth your consideration.

The photos don't do the coloring justice nor the super sparkly blue background behind the little crab: I used some double sided adhesive sheets to create a sticky surface and then dumped Elizabeth Craft glitter on it. Since that glitter is opaque, I did it right on the grey card stock – as you can see, you can't see any grey, the glitter covers it right up. I wish you could see this for real, it's brilliant (pun intended).


And if you wonder what's up with this 'weird' sentiment – well, I saw the little character from Mama Elephant and he reminded me of a crab. And the crab reminded me of a scene from one of my favorite TV show, 'Signed, Sealed, Delivered', from the Hallmark channel (if you are not in the US, you can grab it via iTunes). It's just a feel-good show, with some darling characters and one of them cheers up another one by telling her that while's she's soft on the inside, she's like a special breed of crabs: she has a tough outer shell that makes her unsquashable :) I thought this would be a great card for someone who needed some cheering up.


I hope you enjoyed the card and you have a great Valentine's Day! Thanks for stopping by!

Saturday, 7 February 2015

Keep it Clean and Shiny with CASual Fridays

Hello fellow crafters! If there's one technique I'm always struggling with it's clean and simple. I always start out with the resolution to make something that's CAS, but in the end, it never really is. So, today, I'm doing my best to keep it as clean as I possibly can and I'm using an awesome set from CASual Fridays.

As of now, all CASual Fridays products have been moved to the Discontinued Brands section in the Make The Day Special Stamp Store because the brand will be discontinued here in the store.  But of course you can still get your fix at www.casualfridaysstamps.com – but don't forget to check out the current deals at the MtDSS Store here!


My card took all of 10 minutes. Seriously. All you do is stamp the image in Versamark, then sprinkle Judkins Sticky Stuff embossing powder on it and heat set it. The moment the embossing powder turns sticky, stop heating it – it’s sticky now and that’s when you apply the Gilding Flakes.


Mush the flakes onto the sticky surface while holding your breath – this stuff is super light, so heavy breathing (darth vader style) or sneezing (heavens forbid!) will make the air around you sparkle ;) Once you’re done, use a scrubby tool to get all the excess flakes off and reveal the actual shapes you’ve covered ;)

I’m also very impressed by the fine detail I got; even though the Sticky Stuff is pretty coarse. You might want to heat it from behind to make sure you are not blowing off the embossing powder. And because it was so easy, I wondered if I could use another medium to create a similar card: once more, I used Versamark and Judikins Sticky Stuff, but then sprinkled it with Elizabeth Craft Designs glitter. After carefully pressing the glitter into the sticky surface, I rubbed off the excess and made the glitter shine.


You might see here that I didn’t get the finest details as well as I did with the gilding flakes, so I’d recommend this technique for images which are not quite as detailed, but I still like the effect immensely. I’m not sure how well it translates to the photos, but in person, the sparkle is just stunning.


Add to it the stark contrast of the black sentiment, and you have one clean and simple card. Only fitting to use CASual Fridays stamps for it, I’d say :)


Thanks for stopping by today! Don't forget to check out the CASual Fridays sale over in the shop while supplies last! Happy crafting!

Saturday, 31 January 2015

Good Friends Are Like (Glittery) Stars

We are still approaching Valentine's day and if you – like me – don't really like the traditional love cards or currently don't have anyone to give such a card to, maybe this will inspire you. Why not create valentine's cards for your friends and tell them how much you appreciate them? That's what I did with one of my favorite Avery Elle stamp sets, Written In the Stars.


The front panel was cut with a Mama Elephant die, and the circle with a Waffle Flower die – I just love the stitched effect around the circle, it makes it look so much more finished. Right behind that front panel, I mounted a sheet of vellum. On it, I created the sparkly starry heart with Elizabeth Craft Glitter. Carefully rub it with your finger to set it and voila – a super sparkly, stamped image:


I stamped a few stars on the card base behind the vellum with silver ink. You can not see the stars clearly, but that was okay because it works perfectly with the sentiment I had chosen.

I hope you enjoyed the card and will find new uses for some non-Valentine's themed stamp and die sets! Thanks for stopping by!

If any of the products I used for this project are not available in the store, I'm offering alternative products at the end the product listing below.

Saturday, 10 January 2015

Glitter Up Your CAS Card

I love the CAS style, but once I start doing a card clean and simple, I always feel the need to add something – I simply cannot leave the project well enough alone and just stop. So, I knew ahead of time with this project that I needed to curb my enthusiasm of embellishing and fiddling – and the Elizabeth Craft Silk Glitters were super handy in this case.


I started by die cutting a panel for my card, from which I then die cut the Spring Flowers with the Lil’ Inker dies. Once I knew where the openings in the front panel were, I sponged some Distress Ink in vibrant colors onto the actual card base, so it would peek out underneath the die cut shapes. It took some fiddling, since I needed to make sure the reds wouldn’t show up in the yellow flower and vice versa, but by working slowly and checking now and then, it worked out just fine. I’m working on a white card card stock that was cut slightly smaller than the front panel; it wouldn’t have worked to sponge the color onto the grey card base.


I die cut two flower centers from paper which I had put on double sided adhesive tape, and then I took off the liner paper and dipped the sticky shapes into the Elizabeth Craft glitter. You want to burnish this glitter afterwards – I simply rub my finger over it for about 10–20 seconds. You will see a noticeable difference – the glitter becomes really shiny and the color intensifies. Nice side effect – it also doesn’t come off anymore (and it won’t come off your hands and face either, which is why you want to have a cheap antistatic cloth ready).


Before I mounted the front panel on the card base, I used my Wink of Stella clear pen to make it shine (a lot). I really went over it a few times until it looked almost like a pearlescent card base. The flowers were mounted on two layers of foam tape so they’d be slightly raised and you could see the background color peek out from underneath.

I hope you liked the card and got inspired! Have a wonderful weekend!

Sunday, 2 November 2014

Glitter-tastic!

One of the things I love about running a craft shop is getting to "test" all the new products for you all - it's a hard life you know ;-)   I am a crafter first and foremost, so if I try something and I find a flaw - I will let you know - today though that is not an issue with the new glitters we have in store.  I had resisted them for a while as I thought they were pretty pricey - afterall - glitter is just glitter right?   WRONG - this stuff is AMAZEBALLS!   When the say "super fine" they aren't kidding - this stuff looks similar to ultrafine embossing powder.  So the ½oz pots will go a VERY long way and man does it sparkle!


I die cut an ornament from Paper Smooches from the double-sided adhesive sheet and then covered it in 3 shades of blue glitter to get a shaded effect (I used Blue Purple, Royal Blue and Bluebell - all of which can be found here) and then added the ornament topper in grey and silver.  A bauble needs somewhere to hang and for that the new Spring and Berries die from Elizabeth Craft Designs seemed the perfect choice and to add interest I used the matching embossing folder in the background.  A simple die cut "joy" sentiment was the perfect finishing touch.

The glitters are so easy to use - just scoop a little out with a bit of paper, sprinkle and "polish" into the adhesive with your finger.  Shake off the excess and add back into the jar and repeat with your next colour (if you mix your colours - save them to a new jar for your own personal colour blend!)   It's painting with glitter and I love it!


NEWS FROM THE STORE:

  • We've had the new glitters, embossing folders, lots of standalone dies and some shimmer sheetz - check out the Elizabeth Craft Designs section of the store
  • We've had Lawn Fawn restocks - so the Hillside Borders, Goodie Bags and Rectangle dies are all back.
  • Lil' Inker Designs latest release will be here next week
  • The latest releases from Altenew, Winnie and Walter and Neat and Tangled are all in transit - I do get stuff here as quick as I can guys but I'm at the mercy of when suppliers can ship to me, and how long it takes stuff to travel and clear customs.  I hope everything will be here by mid-November.
  • Mama Elephant restocks are coming and they have a new release out again which I will order today so that will be here in around 2-3 weeks as well!
  • I'm waiting for my distributor to get the Hero Arts stock back - as soon as they do I will get all the embossing powders etc back in stock too - they are in the UK so arrive quicker once they have them.  Hoping they will get them this week.
  • If you're waiting for an item from another brand to come back into stock - it will happen - it may just not happen immediately.  I only order restocks with new releases as it is not cost effective to import small quantities from the USA - if you saw my customs bills you'd faint!!!   So please bear with me - the restock system is "manual" - I write all your requests down on old fashioned paper, and then physically email you once they come back into stock.  So you WILL get an email eventually you don't need to keep sending requests - I just have so many requests I don't have time to reply to them all when they arrive as well.  Just be assured, they come through and I have you on my list.

Right - time to get the shopping done as there is nothing in the house but stamps and glitter to eat!

Happy Crafting

Tara