Showing posts with label Keren Baker. Show all posts

Tuesday, 8 December 2015

Classy Rudolf!


Hi! Hope you're enjoying this Tuesday. 
With the flurry of crafting going on around, I thought I'd do some repeated stamping. 
One small image- giving a bigger impact.
I've used this stylised image from the Winnie & Walter set 'Comfort & Joy'
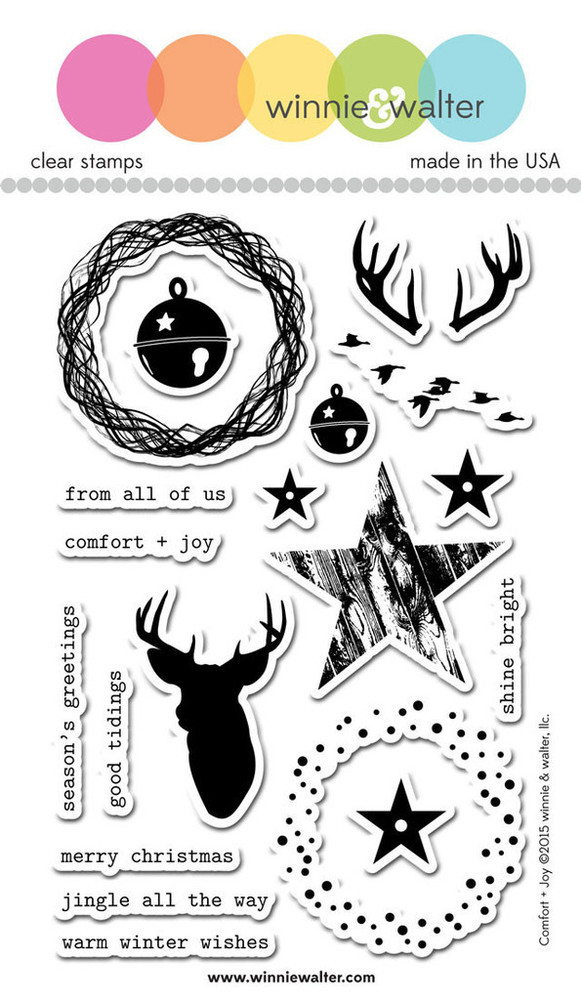
There's rather a lot you can do with these images. The wreaths are great around the reindeer's heads, the wording is great for a background.
I've wanted to dress up Rudolph/Rudolf!!

I sewed a couple of bells onto the antlers and gave a few of the deers some gold leafing.
I added in some slightly softer colours to try and make the card a little more sophisticated whilst adding the tiny nose to give a bit of humour and let your recipient know that it is Rudolph; all grown up and a bit classier!! 
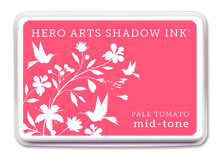
The Hero Arts inks are great for solid images- they give good coverage although they do dry slightly darker so that's worth remembering!

Well, that's enough from me, I'm sure you've all got plenty of crafting/shopping/eating mince pies to get on with!
See you next week

Keren xx

Tuesday, 1 December 2015

Decorations with Calories!

 
 Hi! Hope you're all enjoying the beginning of DECEMBER!
Wahoo. It's finally here. In lieu of having actual calories, I thought I'd just take photographs of some, or more precisely, capture some and save them for later!
 Well, a plain packet of sweets is not up to much, but create your own sweet filled tag or even something to hang on the Christmas tree or adorn your table. It's really easy, when you've got the perfect die!- (or this one if you want the dies that cut out the stamped characters from the matching stamp set too!)
http://www.makethedayspecial.co.uk/shop.php#!/Ready-Set-Snow-Shaker-Lawn-Cuts/p/53952037/category=5302074
 
I've backed the globe with the lovely' Let's Bokeh in The Snow' paper
http://www.makethedayspecial.co.uk/shop.php#!/Lets-Bokeh-In-The-Snow6x6-pad/p/53952005
It's just a case of gathering all the elements together (including these yummy mint M&M's)

Then just stick the acetate window into the frame shape. Add the blue snowy cut out to the larger outline piece and add a ton of foam pads.
When I say ton, I mean a TON. Unfortunately the sweets I'd chosen were super enormous. Let's just say it took rather a large amount of foam pads layers. Next time, I'm choosing some flatter sweets!

I wanted to add some glimmer and sprinkled in some edible lustre. It went everywhere!! I had to open it up, wipe out the lustre and re-seal. Fortunately, there was enough left to give a shimmer. Once I'd finished, I had the rest of the sweets to use up!
 
 This was really easy to make. No faff, no foam pads ;-) Here's what you need.

http://www.makethedayspecial.co.uk/shop.php#!/Joyful-Tidings-Tag-set-by-Lia/p/53818086/category=10186244
The tag set by Lia Griffith is perfect for this treat box. Simply make up a simple box shape. I just took the width measurements slightly wider than the tag shape.
I found a small acetate bag, added in the sweets and sealed it with the Candy Lane Washi tape
 Add the bag to the bottom of the box and then stamp out the 'Noel' and add to the tag.
Pull the tops together with twine and you'll find it makes a lovely shape.
Hope this gives you a push to creating your own favours, tags and decorations. If you don't like calories, just add a diamond ring or two ;-)


Thursday, 26 November 2015

Tons of Christmassy Thanks!


Hi there!
Thanks to Lydia kindly swapping with me, you've got me today instead! If you've come to see Lydia, just check back to Tuesday!

So, I decided to make a non- Christmas set, a little seasonal. I saw this adorable elephant and knew she would just look perfect in a Christmas jumper
http://www.makethedayspecial.co.uk/shop.php#!/Tons-of-Fun/p/54809010/category=9064880

I am totally not one of the ugly-Christmas-jumper-wearing club, but I have to admit that this jumper is cute. I've used the tiny stars from the set to make the stars on his jumper and also the stars on the little socks that are festooned on the tree. Speaking of socks.. I used these ones from the 'Take A Load Off' set
http://www.makethedayspecial.co.uk/shop.php#!/Take-A-Load-Off/p/35349270/category=9064880
I had the little scene in my mind and so used one of the presents from the Tons of Fun set as the base for my tree. I used this fab Lawn Fawn paper pack 'Let's Bokeh in the Snow'. Usefully, the paper makes it look like the Christmas tree has lights on- so even better!

http://www.makethedayspecial.co.uk/shop.php#!/Lets-Bokeh-In-The-Snow6x6-pad/p/53952005/category=10168036
I simply cut out a simple tree shape, added foam pads underneath it and then added it to the card. Using the socks from the other set, I coloured them, added a white embossed star on each one and placed them on the tree. I even cut into Ellie's trunk so she could hold one of the socks in her trunk which just gave a little bit of cohesion to the scene.
I chickened out with the sentiment. Yes, I was wanting to say thanks and this card will come in handy for saying Thankyou after Christmas, but I stamped on a piece of spare cardstock whilst deciding where the sentiment was going to go and then worried I'd mis-stamp it so just adhered the sentiment onto the card! (a handy tip for newbie stampers...and old-hands too!).

Well, hope my sock-hanging Ellie made you smile and gave you some ideas for using your non-Christmas sets in a new and fresh way!

See you next week!


Tuesday, 17 November 2015

Peace & Leaf & Wreath!


Hi! Hope you're ok.
I love leaves, love wreaths, and love this set from Winnie & Walter; Renee's Leaves
http://www.makethedayspecial.co.uk/shop.php#!/In-Bloom-Renees-Leaves/p/56463204/category=9316076
The great thing about all of these leaf and floral sets, is that all the images are kept the same sizes across the sets, so you can mix and match them perfectly.

Creating this soft look is pretty easy. I've stamped in Versamark and added Hero Arts white embossing powder
 
http://www.makethedayspecial.co.uk/shop.php#!/Hero-Arts-White-Embossing-Powder/p/43293335/category=11057839
 
 
with both the Renee's Leaves set and In Bloom: Elsa's Floras
 
Heat to set and then blend in various colours of ink. Trim them out and create a wreath shape, allowing the leaves to be free from adhesive at the top and only adhering them at the base. Once you've stacked all the flowers and leaves into a nice shape, stamp the sentiment using this set. With everything that's been happening in the world in the past few days, I thought that the sentiment was appropriate.
http://www.makethedayspecial.co.uk/shop.php#!/Merry-&-Bright/p/56463218/category=9316076
The leaves can be used throughout the year and you can change the treatment of them.
Here, in this sample, I've stamped in black, sponged again but only partially and added some detailing using a black fineliner.


How would you use the leaves? You can't see in the photo, but I've added a generous layer of sparkle and I added the red layer to give it more of a contemporary look. Sadly, the card's girth or 'hips' as I like to call them, are rather too wide! ;-)  It was too late to trim it down by the time I realised that the proportions could have been improved. 
 
Do have a rummage around all the new Releases from Winnie & Walter. I've really enjoyed playing with the new sets.

 
 See you next week,
Keren xx


Tuesday, 10 November 2015

Easel-y the Cutest Dog!

Hi! I've been having fun with parquet..or more precisely, pretend parquet! I was looking at the Playful Pups set from Mama Elephant and I somehow had an idea for a room and then the easel card developed from there!
I grabbed this pack of self adhesive wood sheets and trimmed out lengths and cut into tile shapes, then I just arranged them like a wooden floor

http://www.makethedayspecial.co.uk/shop.php#!/Peel-&-Stick-Real-Wood-Veneer-Pack/p/39846264
To make the mirror, I just cut a rectangle of thin adhesive metal (plumbers tape) and stuck that onto a sheet of wood. It gives the illusion of a framed mirror without all the hassle!

 The easel part is pretty straight forward, just a piece of cardstock, split into 3 not quite equal parts, scored and folded. Hopefully this photo makes more sense!
You're probably wondering how you'd get it into a card? Well, if you get a thin strip of acetate, fold it into a cube shape (4 sides plus a bit extra for adhering) and stick it to the back of the mirror and dog, it will actually fold flat(tish).
I've just used small pieces of left over paper to create the bunting. Stamp the sentiment and add on a little bell to make the dog look like he's playing with it!

Hope you give this type of card a go, its so easy and is something a little different. Trying out a patterned wood floor was good fun too. I wish I could create a real life one on my kitchen floor!

See you next week

Tuesday, 3 November 2015

Birdy Christmas !

Hi! I know it's only November but since the adverts are all 'Christmas-ified' and the Christmas films are on, I thought you might forgive me for starting off with a simple card that could easily be a winter Birthday card too.
I'm using some Lia Griffith sets; Build A Wreath
http://www.makethedayspecial.co.uk/shop.php#!/Build-a-Wreath-by-Lia/p/53818073


 and the Stamp/Die set 'Joyful Tidings'
http://www.makethedayspecial.co.uk/shop.php#!/Joyful-Tidings-Tag-set-by-Lia/p/53818086
Rather than create ornaments, I wanted to make a simple card. It's mini sized to make more of a feature with the ornament shape.
These would also make great table cards for all that entertaining you might end up doing!
 

I wanted to use this 'Make A Wreath' set but not as a wreath. This is an incredibly cute set and if you don't mind a bit of fussy cutting, it's easy to create something 3D. I've added some graduated colour using a Distress ink colour and then some white and black pen details.
 

I've already used this set in alternative colours as tags for a previous MTDSS challenge
I added this 'Elves By Lia' set too
http://www.makethedayspecial.co.uk/shop.php#!/Elves-by-Lia/p/53818070
Hope you get some ideas of how to use these lovely stamps/dies. It would also be great to stick them together after you've folded several in half and then adhere them together to create a 3D ornament.
 
See you next week,


Tuesday, 13 October 2015

An Off-Piste Cable Experience!


Hey! How are you? 
I know it's getting chillier and thought I'd use this really fantastic die set
 I got out the set and stared at it for a while and got a little stuck. I cut out the snow drifts and lay them onto the card base and that's when, the pre-trimmed elements just looked right. The snow extending past the card looked in proportion and then as I added the cable cars, it grew into the design that it is!


 Now, granted, it's a little bit of fun. By extending past the card I've gone 'off-piste' (does the title make sense now ;-) )
I've also used the gorgeous notecards
       
You can see the little animals sticking out of the decorated cable cars. I've added acetate to the windows too!

The cute animals are from the Storybook set, but this set would do just as well
Oh, and in case you were wondering, the trees are in fact mountains. You can really change them all around- it's a wonderful versatile die set.
I'll go back to my shivering now! See you next week,