
I've got a lot of cards to share this week, on a common theme of sewing but without a single needle in sight!
Firstly, I've been wanting to share this card for ages but we've been waiting for the very popular hoop die from Neat and Tangled to come back into stock. Before I was a card maker, I was a cross stitcher so the hoop really spoke to me and I made a faux stitched floral design to sit inside it.

To create the hoop I die cut the elements from one of our own brand self adhesive wood veneer sheets for authenticity and cut the screw from some grey card and layered it over top. For the stitched design I stamped one of the floral images from Paper Smooches Blossoming Buds with a very pale ink in the same way you would for the no line colouring technique. I then used some coloured fine point gel ink pens (the sort you use to write with) to drawn stitches into the flower the way you would embroider them in satin stitch. I curved a sentiment from Sunday Sentiments from Mama Elephant inside the hoop and embossed the background using Lawn Fawn's stitched borders. If you don't want to draw the stitched lines yourself, then there is a beautiful hand stitched stamp set that fits inside the hoop die.
For my next cards, I started with one but the elements I die cut to make it meant I had enough pieces to make 5 cards so here you go - batch quilting with no sewing required! I love the Quilt Square Cover Up Die - it's great for paper piecing. We only have one left in stock right now, but I will get more back in early November with the next My Favorite Things release if you want to give these a whirl. [Edited - we just sold out of this die -sorry - it will be back, but in the meantime you could try the smaller version from Wplus9 that we do have in stock here]

I die cut it 4 times - once using white card to make the "frame" and 3 times using coloured paper from My Favorite Things Calm and Cozy Chevron paper pack. I pieced the shapes with the 3 colours making sure to keep all the chevrons pointing in the same way. I mounted it onto a kraft base and added a sentiment on top using the Merry and Bright die from Lil' Inker Designs but snipping it out of its frame. I did a double layer of it to make the sentiment really "pop"
As I had all the coloured bits in 3 colours this meant I could duplicate the design 3 times with the different colours in different places.

For this one I did the same layout but instead of die cutting a sentiment I embossed a sentiment from MFT's Joyous Christmas Sentiments using Platinum embossing powder (sorry awful photo too much glare today) to tie into the silver pearl base card.

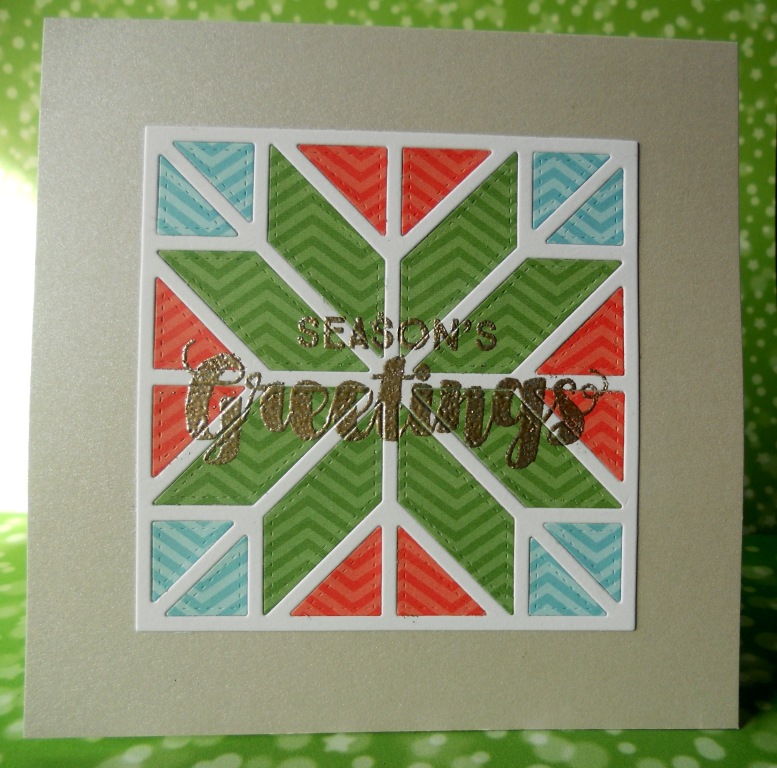
For this one, I decided not to use a frame and just used the coloured pieces (using a frame to lay it out and get them straight but removing it after they were all glued in place). I hand drew stitched lines around with a grey fine liner and then added a die cut sentiment over the top using Avery Elle's Season's Greetings die.
So that took care of all the coloured "pieces" but I still had 3 coloured frames, and being askinflint, canny Yorkshire-lass, I couldn't bear to bin them, so I came up with two uses for those as well!
Firstly it screamed shaker card to me, so I made a really simple one using a stitched square die - any of the ones you have would work - you just need to find one large enough for the frame to fit in. I used Lil' Inkers largest two here. I went with the same die cut sentiment on top.

For the final one, I went a bit off piste and cut the two remaining frames up a little bit to create a kind of snowflake. I simply layered them over each other rotating one 90 degrees and then stamping the sentiment over the top. To keep the stitching theme I used the square die to emboss a stitched frame around the edge of the card. Where the die cuts are thick, the ink may not hit the base card, a fine liner to fill in the missing bits is your friend here so pick an ink colour you have a pen to match with!

So that's me for this week - sorry it's late - we made the most of the extra hour's sleep this morning!
NEWS FROM THE STORE:
We'll have a couple of arrivals this week coming:
We'll also be getting the new release from Stamping Bella, Sugar Pea Designs and My Favorite things in early November. We'll be restocking Lawn Fawn and Avery Elle too.
Firstly, I've been wanting to share this card for ages but we've been waiting for the very popular hoop die from Neat and Tangled to come back into stock. Before I was a card maker, I was a cross stitcher so the hoop really spoke to me and I made a faux stitched floral design to sit inside it.

To create the hoop I die cut the elements from one of our own brand self adhesive wood veneer sheets for authenticity and cut the screw from some grey card and layered it over top. For the stitched design I stamped one of the floral images from Paper Smooches Blossoming Buds with a very pale ink in the same way you would for the no line colouring technique. I then used some coloured fine point gel ink pens (the sort you use to write with) to drawn stitches into the flower the way you would embroider them in satin stitch. I curved a sentiment from Sunday Sentiments from Mama Elephant inside the hoop and embossed the background using Lawn Fawn's stitched borders. If you don't want to draw the stitched lines yourself, then there is a beautiful hand stitched stamp set that fits inside the hoop die.
For my next cards, I started with one but the elements I die cut to make it meant I had enough pieces to make 5 cards so here you go - batch quilting with no sewing required! I love the Quilt Square Cover Up Die - it's great for paper piecing. We only have one left in stock right now, but I will get more back in early November with the next My Favorite Things release if you want to give these a whirl. [Edited - we just sold out of this die -sorry - it will be back, but in the meantime you could try the smaller version from Wplus9 that we do have in stock here]

I die cut it 4 times - once using white card to make the "frame" and 3 times using coloured paper from My Favorite Things Calm and Cozy Chevron paper pack. I pieced the shapes with the 3 colours making sure to keep all the chevrons pointing in the same way. I mounted it onto a kraft base and added a sentiment on top using the Merry and Bright die from Lil' Inker Designs but snipping it out of its frame. I did a double layer of it to make the sentiment really "pop"
As I had all the coloured bits in 3 colours this meant I could duplicate the design 3 times with the different colours in different places.
For this one I did the same layout but instead of die cutting a sentiment I embossed a sentiment from MFT's Joyous Christmas Sentiments using Platinum embossing powder (sorry awful photo too much glare today) to tie into the silver pearl base card.

For this one, I decided not to use a frame and just used the coloured pieces (using a frame to lay it out and get them straight but removing it after they were all glued in place). I hand drew stitched lines around with a grey fine liner and then added a die cut sentiment over the top using Avery Elle's Season's Greetings die.
So that took care of all the coloured "pieces" but I still had 3 coloured frames, and being a
Firstly it screamed shaker card to me, so I made a really simple one using a stitched square die - any of the ones you have would work - you just need to find one large enough for the frame to fit in. I used Lil' Inkers largest two here. I went with the same die cut sentiment on top.

For the final one, I went a bit off piste and cut the two remaining frames up a little bit to create a kind of snowflake. I simply layered them over each other rotating one 90 degrees and then stamping the sentiment over the top. To keep the stitching theme I used the square die to emboss a stitched frame around the edge of the card. Where the die cuts are thick, the ink may not hit the base card, a fine liner to fill in the missing bits is your friend here so pick an ink colour you have a pen to match with!

So that's me for this week - sorry it's late - we made the most of the extra hour's sleep this morning!
NEWS FROM THE STORE:
We'll have a couple of arrivals this week coming:
- The new release from Waffle Flower Designs - lots of planner stamps and dies in this one!
- The reindeer will be back from Mama Elephant
We'll also be getting the new release from Stamping Bella, Sugar Pea Designs and My Favorite things in early November. We'll be restocking Lawn Fawn and Avery Elle too.


