Monday, 24 August 2015

Faux Textured Florals


Hello there :) .... I have a bright and colourful bouquet for you on my card today... perhaps a little unrealistic like those heavily enhanced photographs in plant and seed catalogues but cheerful nevertheless :) I have also used a great technique to give those solid florals and leaves a subtle texture too....


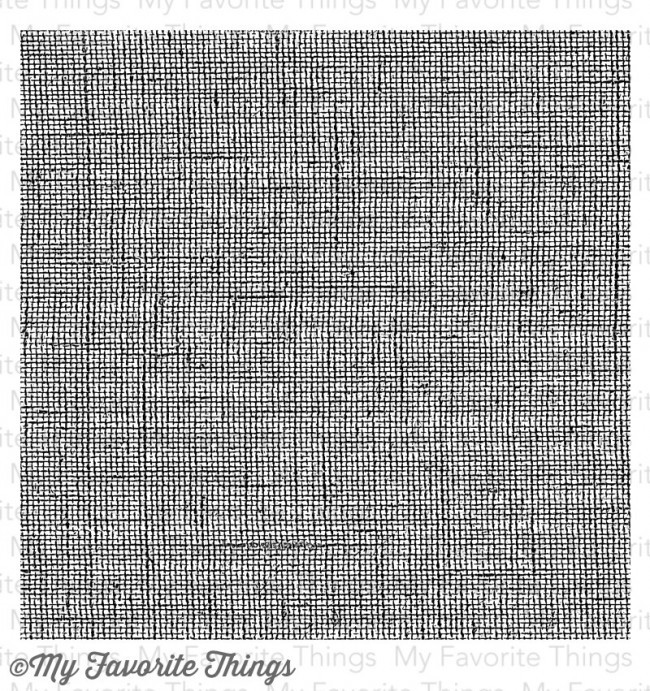
This is a technique I've seen many times and uses the properties of Versamark ink to repel dye ink.... I have satmped the MFT Linen background onto some white cardstock and allowed it to dry for a good 30 mins at least, before stamping the petals and leaves in dye ink over the dry Versamark ink. The linen pattern shows through as a subtle texture and the darker the ink the more obvious the pattern.

I have used Prismacolour pencils to add some shading, as long as you have a light touch the pattern should still show through.


I stamped these flowers over the period of a few days and the effect of the versamark showing through the ink seems to fade with time, as you can see on the blue and yellow flowers which have hardly any texture at all. It may also have something to do with a larger area showing more of the pattern and the amount of shading you add but I'm quite happy with the result :)

It's a great way to stretch those background stamps and give new life to your solid stamps too... have a flick through your stamps to see what ideas you can spark :)

Here are the products used:
            Petals & Stems  Linen Background Stamp 
                                         Bear Hugs

Thanks for stopping by :)
Jenny x

Sunday, 23 August 2015

Pearly Snowflakes

Quick post today as there is a LOT going on in MTDSSS HQ at the minute.   We have so much new stock that has just arrived or is due in the next 10 days that I'm really not sure where we're going to put it all!   More on that below.

The latest new arrival is the Christmas release from Hero Arts and one of the many things that grabbed my attention was this beautiful hand-drawn snowflake background stamp.  Coupled with the new pearly white embossing powder you have the basis for a couple of quick Christmas cards.....


I stated by embossing the whole stamp onto glossy white cardstock using the new Pearly White powder.  Inking over with Mint Julep, Cornflower and Emerald shadow inks gave a soft verdigris effect so I decided to add copper into the mix too.  The snowflake is die cut using the Lil' Inkers Dies and embossed in the copper powder and the sentiment is stamped over the edge of the panel.  The sentiment is from Big Bold and Seasons by Winnie and Walter.


As I'd cut the stamped snowflake panel in half it meant I could make two cards - for this one I stamped the same sentiment onto a flag panel and used a square card and different snowflake for a different look.


NEWS FROM THE STORE:

  • Echo Park's latest co-ordinating collections have just arrived in store.
  • Hero Arts Winter release is now in store - some items were not shipped so are listed but showing as out of stock - I am hoping they will follow soon but am waiting for an answer from the distributor.
  • Stamping Bella's latest release is shipping next week so should be here soon.
  • Lawn Fawn's massive winter release will be live in store on the 27th August - as soon as it is released in the States.
  • Avery Elle's winter release has been delayed by a week so that will now be in store on 3rd September, again, as soon as its released in the States.
  • Winnie and Walter restocks and the latest releases from Sugar Pea Designs are hopefully shipping soon.
  • New releases from Neat and Tangled, Lil' Inker Designs, Paper Smooches, Mama Elephant and My Favorite Things will be ordered in the next week or so and will follow soon after - it's a little like painting the forth bridge around here at the minute!

Saturday, 22 August 2015

Clean and Simple Copic Coloring with Wplus9

Hello again, crafters! Today I have a clean and simple card for you featuring two of my favorite new products: Doodle Buds stamps by Wplus9 and a new die set by Avery Elle.

I wanted to create a one layer card, but one that would have a really huge impact. That's why I decided to go with very intense colors.


As you can see, I've also enhanced the flowers and some of the leafs by adding accents with my black Copic liner. For additional interest, I used my Copic markers to also add some dots around the flowers. The die by Avery Elle is framing the arrangement perfectly.


As always, I was using Copic friendly card stock but it bled through to the inside. This was fixed easily by adhering a piece of card stock to the inside of the front panel. That makes it look very clean inside and on the outside it still appears to be a one layer card.

Thanks for stopping by today and I'll see you again soon!

Friday, 21 August 2015

A Wild Watercolour Ride.

Hi everybody,

Jill here.  I hope you're all well.


I've got some of the newest release from WPlus9 for you today, and boy oh boy what a killer release it was!


I used the 'Going Places' stamp and matching die sets to make my card.  I'm not sure if it shows well on the pictures, but I added a sneaky little shaker behind the hot air balloon!  


I started by stamping out my elements, and watercolouring them using Distress Ink.  I washed over my background at the same time, to create a pretty sky of pinks and blues.  I then took the matching die set, and cut out my pieces, cutting the balloon from my background at the same time.  I only needed to cut the balloon to create my little shaker window, so inlaid the rest back in.  I covered my window in acetate, filled with some beautiful Neat and Tangled sequins, and sealed up.  I cut a couple of layers of clouds using Mama Elephant's 'Landscape Trio die', one layer from white card, and one layer from vellum.  I then put all my pieces together and built up my scene.  I stamped my sentiment onto vellum and adhered using 'Stick-it' (I can't stop sticking vellum any, and every, where now I know 'Stick-it' is invisible!).  I matted onto another layer of vellum, and another piece of card I had washed with Distress Ink, then onto a soft grey card base.  I embellished with a couple of black enamel hearts, and there you have it.

I hope you like it and would love to read what you think of the newest Wplus9 release.

Everything I used is linked below, so be sure to go and be blown away by how awesome the new sets are!

See you next week.

Jillx

Going PlacesGoing Places Die

Landscape Trio Creative CutsIndex Card Creative Cuts

Stick It Die Cut Adhesive Sheets (pack of 5) Large

     Sunset Shimmer Sequin Mix      Crystal Clear Sequins

Thursday, 20 August 2015

Krafty Thanks

Hello!


I am just stopping by with a simple thank you card using a favourite combo of kraft and white.  When you don't have time to colour I always think that this is a lovely look:


This is another Altenew creation using their lovely Doodle Blooms set which I have white embossed randomly across the kraft base and then used a sentiment from their Many Thanks set on a Lawn Fawn die cut label which is popped up.

I hope you like my krafty thanks card and have a great day!

Sarah x


Doodle Blooms   Many Thanks   Stitched Labels Lawn Cuts   Small Stitched Square Lawn Cuts

Wednesday, 19 August 2015

World photo day


Hello.
Its world photography day today and that's inspired today's cards. 


First up is this card using Lawn fawns #Awesome stamp set.
I am ashamed to say it hasn't seen much ink if any since Ive had it.
I started by using the small camera icon  and heat embossed with clear powder.
I then water coloured and left to dry.
I made the sentiment and added to the water coloured panel.
Very simple to do and some clear sequins finish it just  nicely.


This card uses an older lawn fawn set, Say cheese. 
I love the old polaroid style camera ...still have one in real life too.
I simply stamped and coloured with pencils before fussy cutting.
I stamped the background using stamps from Winnie and Walter and hero arts ombre ink.
To add my sentiment i cut the camera where the picture would come from and place the banner with the stamped sentiment in,

#Awesome Say Cheese Bubble Talk
Ombre Ink Pad Mint to Green Crystal Clear Sequins

I hope you get to take some pictures today ...maybe of cards ...for our challenge? ;)
Thanks for looking

Tuesday, 18 August 2015

Nightmare Surfaces!

 Ever start a card and wish you hadn't?!!
This one definitely fits into that category.. vellum, stitching acetate and flakes plus trying to photograph them too!
So- how do you do the whole 'don't let the glue show' thing ?
The acetate.. washi, Stick It (a fantastic adhesive available in store that's pretty invisible!) or stitching. like I've done here.
The acetate is the same... use the same sort of devices, or use an embellishment over the top to hide the glue.
I've used the following supplies
Trying to photograph it?
Ha.
The acetate shows your reflection and then if you angle it, it looks weird, but there is help in taking the photo when the light's not too bright- early morning so there are less rays bouncing off your picture.

Just pop a few sequins to add some colour to it. I added silver flakes to vellum which worked surprisingly well. You could easily use cardstock but I wanted to keep the light and airy feel to it.

Hope you like my unusual card- just don't have a clue where to write the greeting now ;-)