Monday, 23 November 2015

Garden Grown Birthday Wishes


Hello there :)

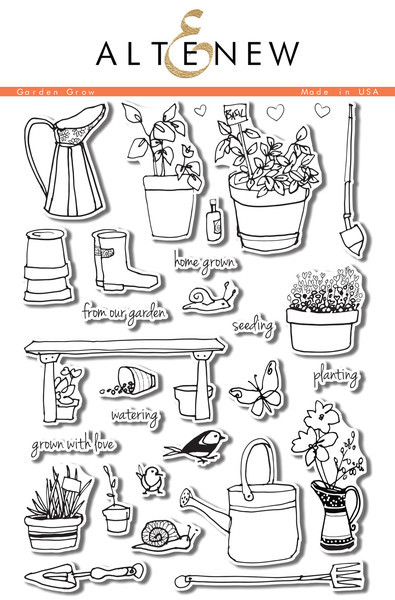
I'm back using one of my favourite stamp sets, perfect for those green-fingered folks. This time I have used the selection of potted plants in the Garden Grow Stamp set from Altenew and their matching dies which are a must for cutting out those intricate shapes ;)


I started by stamping and colouring the plants with Promarkers and Copics then cut them all out with the dies so I could play around arranging my little display :)

To make a subtle background I masked around the edge of the card to leave a rectangle in the centre. I then arranged all the small words and phrases in the set onto a long acrylic block in two staggered lines, making sure I could repeat stamp them across and down the card front. I used three shades of grey ink and started with the lightest at the top.


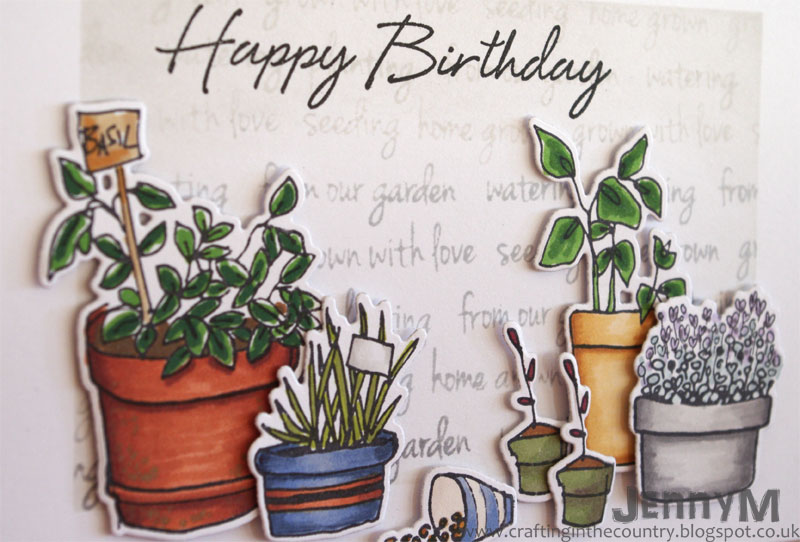
I felt the space needed some soft inking to help define the edges, especially around the lightest grey text at the top, so I sponged light grey ink in from the edges and faded it to nothing in the centre.

The 'Happy Birthday' sentiment is from an old discontinued Hero Arts stamp set in my stash that I felt fitted the card perfectly.

I absolutely love this set... so many uses and possibilities and it was also good to remind myself of a different way to use the smaller text stamps in the set too :)


Thanks for stopping by :)
Jenny x

Sunday, 22 November 2015

Chefs and Penguins

I've been having fun with my Stamping Bella images again this week - this brand was amongst the first I ever bought and remain my firm favourite to this day - I have more of them then I should mention!

On this first card which was specially made for a foodie friend, I've combined two stamps into the perfect card for her from me as we both love to cook!


Here I masked off one of the three chicks from Iron Chef Chicks so I could stamp a pair of them at the feet of Chanel the Chef to create a little cooking scene.   The sentiment is from the Chanel set too and is just the perfect quote for me and my mate too!  I coloured them with zig markers on watercolour paper and then used some co-ordinating strips of paper from the Dots and Stripes Sorbet paper pad from My Favorite Things.


I couldn't resist inking up another older stamp which just came back into stock as Penguideer is just such a fun stamp!


I've used a little trick here when working with small images if you want them to be the main element on a larger card without them looking lost.  I popped the penguin up on a little rectangle which mirrors the design on the base card.  This helps frame him but without distracting from the card base design.  I used Lawn Fawns stitched hillside borders to cut the snow drift and the sentiments are from Toboggan Together.  

NEWS FROM THE STORE:

We have the latest release and some restock from Altenew in stock now.

It will be quieter for the next week or so as the only arrivals we are waiting for are some Hero Arts items including the much anticipating kindness stamps by Jennifer McGuire.   Still no update so I will chase them this week.

Lawn Fawn and Avery Elle will both be starting their next sneaky peeks in a week or so - we've seen it already but can't share - but there are some fabulous new things coming with a focus on Valentines amongst other things.

Wplus9 will also have a new release in early December which we will be ordering shortly.

Lil' Inker Designs new release is on order and will be with us in time for release day.

Thanks
Tara


Saturday, 21 November 2015

Create Depth and Dimension with Copic Coloring

Are you sick of Christmas cards yet? I sure hope not, but I thought that it would be fun to do something non-Christmas related today. It's the season of snow and cold and mulled wine, but also the season of running noses and sore throats. To be prepared for the inevitable cold, which this year will hopefully not strike me down at Christmas, I decided to prepare a few "get well" cards, just to have them handy.


There are a few aspects to this card that I would like to point out, specifically because I have struggled in the past a bit to make sure that my cards have a strong focus point but not a lot of distraction. I either ended up with cards that were too white with a focal point that was not interesting enough, or too much clutter on my card.

First and foremost, I tried to create interest for my focal point (the boot with the flowers) with my Copic markers. You know that I like high contrast coloring, which means I have deep shadows and light highlights. I tried to do this on this board here and I also added a few black dots, simply to give the boot more character.

I could have just mounted it on the white card base, but I decided to use some sponge daubers to create a blended background. I kept with a fall color scheme that would complement of the colors of the boot and flowers. I had the images fussy cut with my Scan ’n Cut machine and the slim white border helps for additional contrast against the background.

By having such a strong colored image and the colorful background, it's much easier and pleasing to the eye to leave the rest of the card white. You have one area on the card that draws in your attention. I even accentuated it by adhering some half pearls to the scallops on the diecut circle.


I had originally intended to add another butterfly on the front panel of the card, outside of the circle, but when I had placed it on my card I saw immediately that it wouldn't work. To have a contained area of color helps to draw the attention and to make that area pop even more against the rest of the card which is stark white.

I hope you have enjoyed this project and have a fantastic weekend!

Friday, 20 November 2015

Snowflakes and Sequins.

Hi everybody,

Jill here, and this week, I am eventually facing the fact Christmas is around the corner!


I've noticed a lot of projects around blog land using a striking red and teal colour theme, and really wanted to try it myself, (there's a couple of cards in particular which I took inspiration from, so will link them at the bottom of my post), and here is my effort... 


I started by inking up a piece of watercolour card using Distress Ink, (Peacock Feathers and Broken China), creating a dark to light gradient, and adding a shimmer by spritzing with water mixed with mica powder, finishing with a few flicks of white.  Once I was happy with my background, I took my Lil Inker's Snowflake's Die, and cut three from my background, (leaving me 3 pretty snowflakes I can use on another card).  I was going to simply add a layer of vellum behind, but when I see a chance to add a wee little shaker to my card, well, I just can't pass it up!  So added some sequins and glitter behind each little flake. 


I cut Mama Elephant's Merry Script Die and coated in a couple of layers of red embossing powder to give it a really high gloss.  I finished my sentiment by white heat embossing a simple 'Christmas', from Lawn Fawn's Trim the Tree, on black card, and cut into a banner.
I added a wrap of bare twine and a cute little bow, and adhered my greeting over the top.  I added some silver Stickles around my snowflakes, and a scattering of sequins to finish off, and there you have it.

I really hope you like it, as always, everything I used is linked below, and below that, the stunning creations that inspired my project.

See you next week.

Jillx

Snowflake Dies   Merry  Script - Creative Cuts   Trim The Tree


Inspo:  This, (which I think might be one of the most beautiful cards I have ever set eyes on!), and This stunner from the amazingly talented Debby Hughes -
and this beauty from Giovana Smith.


Thursday, 19 November 2015

Monochrome Butterfly


Hi there! I hope you are having a great Thursday so far.

It's Lydia here with you today and I'm sharing a heartfelt sympathy card with you today, I know it's not a card that anyone likes to make but they are needed sometimes.

I have used the fabulous butterfly from Altenew 'Bejeweled' and used the matching dies to cut it perfectly. Now usually butterflies are brightly coloured but this was not the look I wanted so I decided to colour mine in grey pencil.


As I wanted the card to be very soft I stamped my sentiment in a grey rather than a black ink, I used Winnie & Walter 'Happiest Of Holidays'. Even though this is from the winter release ths set can be used all year round.


To finish I added a scallop bottom to my card layer using Lawn Fawn 'Stitched Scallop Borders' and added so clear sequins.

Thanks so much for stopping by!
Hugs Lydia xxx


Wednesday, 18 November 2015

In Bloom: Hollies festive florals


Hello.
I have more to share today using Winnie and Walters fabulous new release. 
If you missed Keren's amazing card yesterday also using Winnie and Walter please check it here you wont be disappointed.


First up i have two cards using patterned paper. 
Its something i often struggle with but ive had these papers a while and decided they needed some love.
I kept it simple and cut a panel and used two papers and a strip of glitter tape as the background.
I stamped the beautiful wreath from  In bloom hollies festive florals and fussy cut.
I place it onto the card and added some sequins as berries and the sentiment from merry and bright.


Continuing with the patterned paper ive use d a smaller strip and along with the glitter tape again.
I made the panel bigger and die cute the edge with a lawn fawn border for interest.
The sentiment is from the happy Christmas set.


Now i have created a different effect using the circles that make the berries for the wreath that are also from the in blooms hollies festive florals set.
I stamped them over and over to create a bokeh style. I used the altenew inks and they work so well for this technique.
The sentiment was stamped in black  and to finish i added some diamond stickles.


Again with the stamped bokeh but this time i stamped the wreath over the top and added some red stickles over the berries. 
Another sentiment from the merry and bright set and its complete.
Please click the images below to go to the items used.

In Bloom:  Hollie's Festive Florals  Merry & Bright Happy Christmas
Cool Summer Night Ink Cubes  Red Cosmos Ink Cubes Small Stitched Rectangle Lawn Cuts Stitched Scalloped Borders Die

Thanks for looking.

Tuesday, 17 November 2015

Peace & Leaf & Wreath!


Hi! Hope you're ok.
I love leaves, love wreaths, and love this set from Winnie & Walter; Renee's Leaves
http://www.makethedayspecial.co.uk/shop.php#!/In-Bloom-Renees-Leaves/p/56463204/category=9316076
The great thing about all of these leaf and floral sets, is that all the images are kept the same sizes across the sets, so you can mix and match them perfectly.

Creating this soft look is pretty easy. I've stamped in Versamark and added Hero Arts white embossing powder
 
http://www.makethedayspecial.co.uk/shop.php#!/Hero-Arts-White-Embossing-Powder/p/43293335/category=11057839
 
 
with both the Renee's Leaves set and In Bloom: Elsa's Floras
 
Heat to set and then blend in various colours of ink. Trim them out and create a wreath shape, allowing the leaves to be free from adhesive at the top and only adhering them at the base. Once you've stacked all the flowers and leaves into a nice shape, stamp the sentiment using this set. With everything that's been happening in the world in the past few days, I thought that the sentiment was appropriate.
http://www.makethedayspecial.co.uk/shop.php#!/Merry-&-Bright/p/56463218/category=9316076
The leaves can be used throughout the year and you can change the treatment of them.
Here, in this sample, I've stamped in black, sponged again but only partially and added some detailing using a black fineliner.


How would you use the leaves? You can't see in the photo, but I've added a generous layer of sparkle and I added the red layer to give it more of a contemporary look. Sadly, the card's girth or 'hips' as I like to call them, are rather too wide! ;-)  It was too late to trim it down by the time I realised that the proportions could have been improved. 
 
Do have a rummage around all the new Releases from Winnie & Walter. I've really enjoyed playing with the new sets.

 
 See you next week,
Keren xx